|
|
|
|
|

|
|
DDR Stasi
Minature modular spy receiver
FLE, also known as Projekt 32310, is a miniature modular HF
spy receiver (German: Kleinstempfänger),
introduced in 1980 by Department HV A of the
repressive intelligence service of the former DDR (East Germany)
— Ministerium für Staatssicherheit (MfS),
better known as the Stasi.
It covers 3-19.5 MHz and was issued
as a stand-alone receiver for Base-to-Agent communication.
It was also supplied with the WSA-1 spy transmitter,
as part of communication
system 32210.
|
The device was supplied with up to 10 plug-in units, each of which
covers a 1 MHz wide frequency band.
The device is ~ 75 mm deep and is no more than 20 mm high.
With a plug-in installed it is less than 200 mm wide. It is powered by
a regular 9V battery that is attached at the right side.
Antenna and ground are connected screw terminals on the plug-in.
Audio is delivered to an earpiece that is provided as part of the kit.
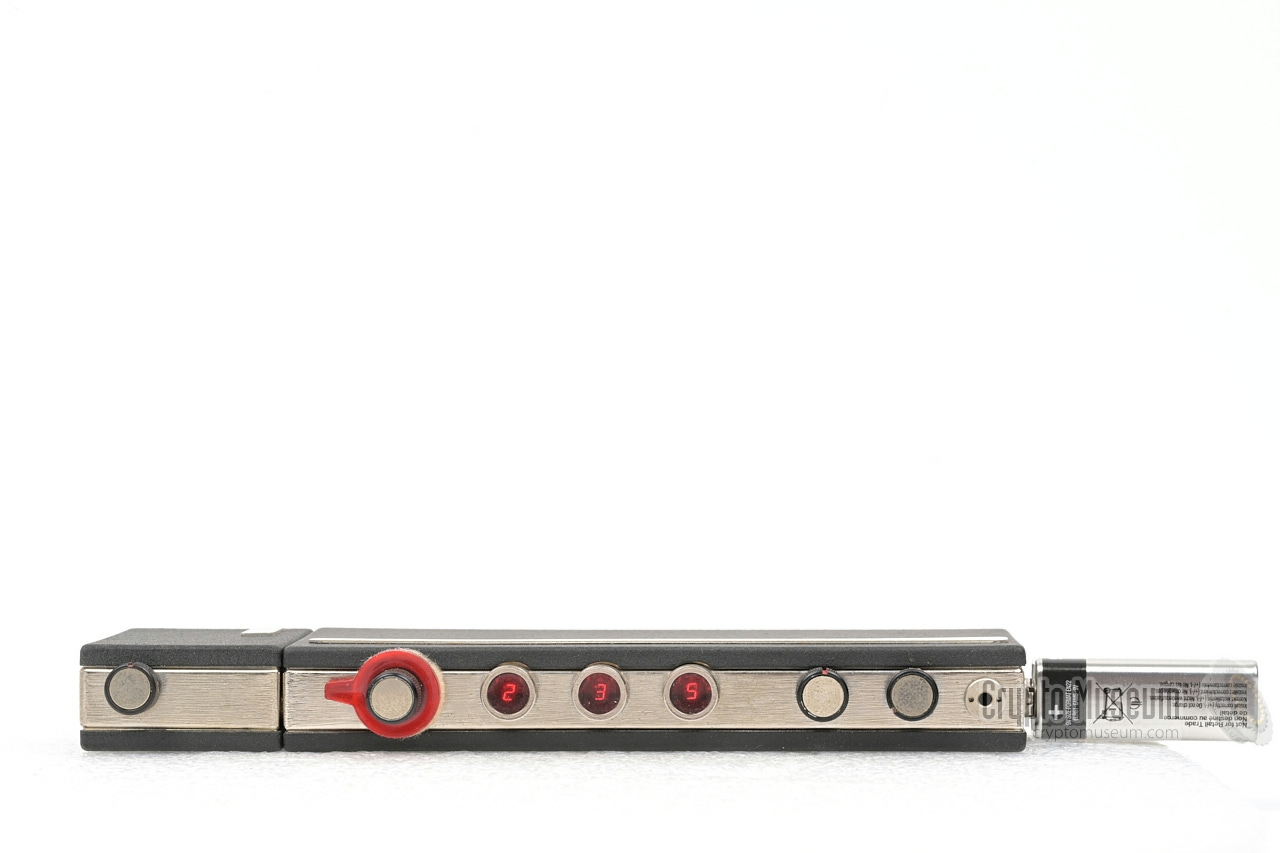
Although the FLE is an analogue receiver, the front panel holds
a digital readout with three 7-segment red LED displays with
individual lenses,
which are part of a built-in frequency counter.
|
|
|
|
The device was developed around 1980 by Department 33 of the OTS of the Stasi.
In a planning document for 1982 [5] it is listed as Sonder-Fertigung (SF)
– special manufacturing – which suggests that it was manufactured by the OTS
itself, probably in small quantities, for special applications.
It's primary user was the HV A of the Stasi, but it was also supplied
to the East-German Army (NVA) and to Department E of the OTS,
who made it available to other customers.
Based on surviving serial numbers,
it seems likely that around 500 units were manufactured (001-499).
|
PLEASE HELP —
Crypto Museum are still looking for the original operating instruction and
circuit diagrams of the FLE receiver (33210). As a result, some of the
descriptions and diagrams on this page are based on our own observations and
measurements, rather than official documentation.
If you have any information that can help us to improve this
description – such as manuals, diagrams, photographs and user stories –
please contact us.
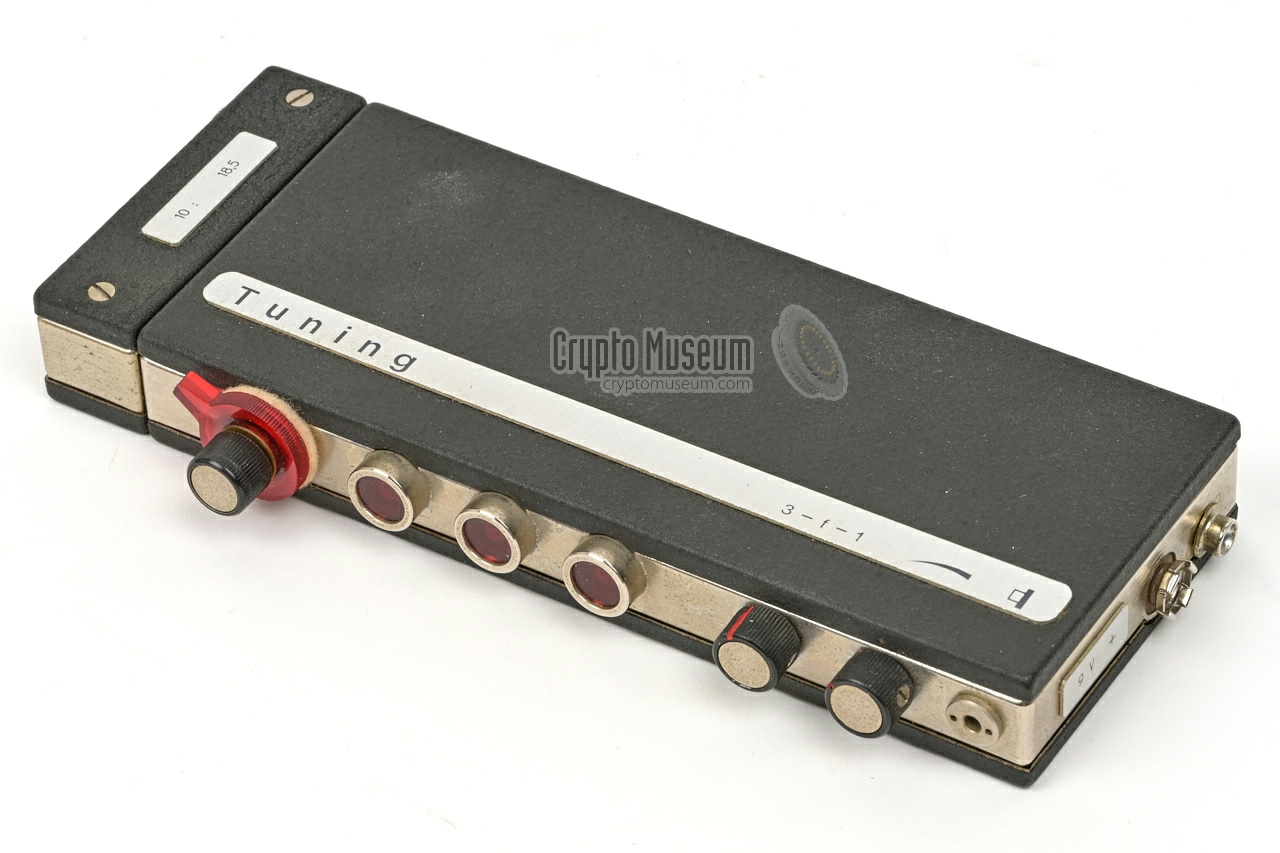
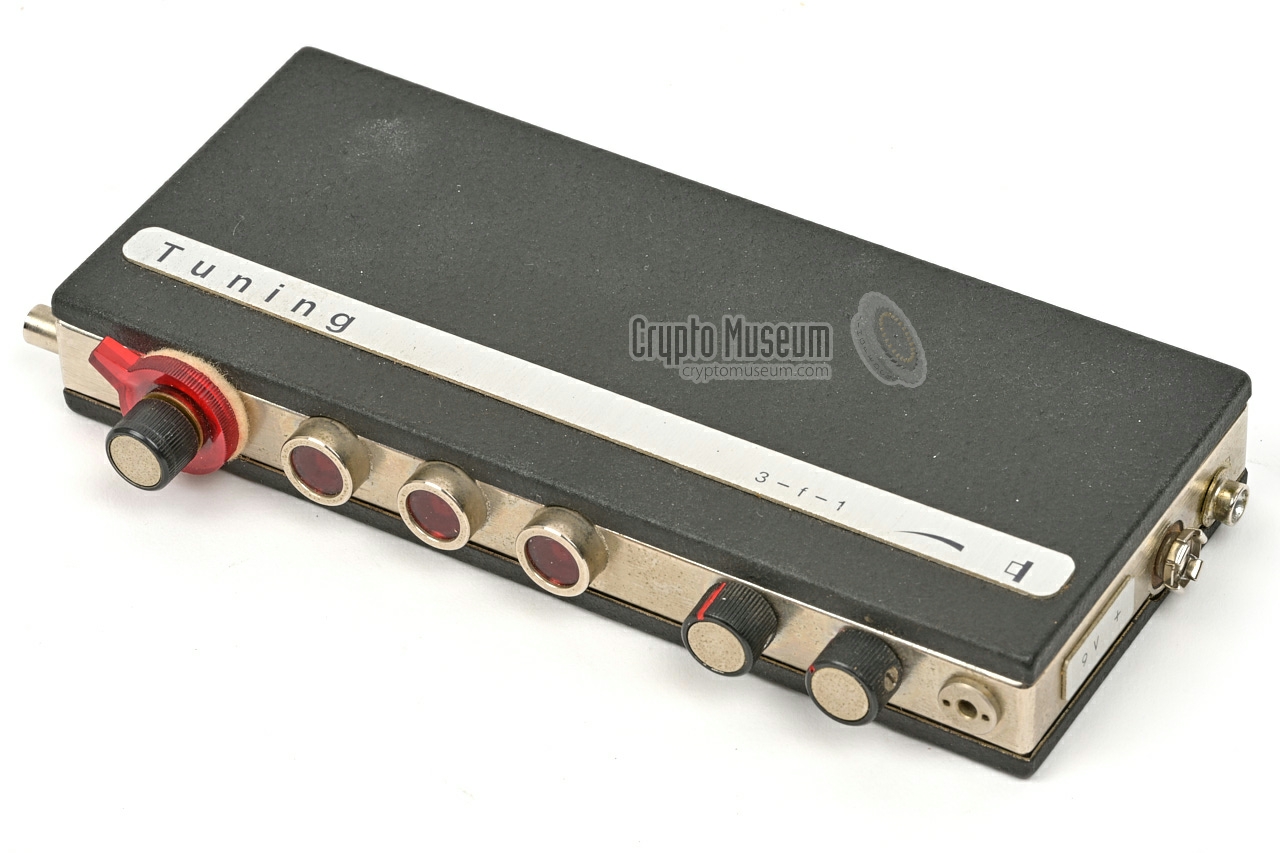
The image below provides a quick overview of the controls and connections
of the FLE receiver. The device is shown here with plug-in unit 1 (3 MHz).
The plug-in should be attached to the two coaxial connectors at the left side
of the receiver. Antenna and ground wires should be connected to the
terminals at the left side of the plug-in. The earphone must be connected
at the right end of the front panel. The device is powered by a a 9V battery
that is attached at the right.
All controls are at the front panel. At the centre of the front panel are
three red circular windows, behind each of which is a miniature red 7-segment
display, similar to the ones that were used in the early digital watches of
the 1970s. Together, the displays form a 3-digit number that specifies
the offset (in kHz) from the base frequency printed on the plug-in's ID plate.
To adjust the offset, place the MODE selector (3-f-1) in the (f) position.
This enables the display (but disables the receiver).
To receive a radio station, place the MODE selector in the 3 (AM) or 1 (CW)
position. This disables the display, although tuning is still allowed
(albeit without readout). This is done to save energy, as the frequency
counter and its digital readout draw a relatively large current.
|
| • | 3 | A3, AM, Phone |
| • | f | Frequency setting (display) |
| • | 1 | A1, CW, Morse |
|
|
Some devices (e.g. serial number 138) came with operating instructions
in German, printed on a label at the upper case shell.
Below is a translation of these instructions.
|
- Determine the desired receive frequency (e.g.: 6453 kHz)
- Select the correct plug-in and connect it to the FLE body
- Each plug-in covers 1 MHz (e.g.: 5.7 — 6.7 MHz)
- Calculate the offset from the frequency on the label, e.g.:
- Desired frequency = 6453 kHz
- Use plug-in (2) 5.7 MHz (= 5700 kHz)
- Offset = 6453 - 5700 = 753 - Connect the antenna (and ground)
- Connect the earphone
- Connect a 9V battery (the device should work immediately)
- Set MODE-selector to centre position (f)
- Adjust the tuning knob so that the calculated offset is in the display
- Set the MODE-selector to the desired modulation type (3 = A3, AM), (1 = A1, CW)
- Adjust the volume control
- Adjust Antenna tuning for maximum noise
|
When the battery voltage is too low, the decimal dot of the three
displays will light up.
|
The diagram below shows how the device's frequency range from 3 MHz
to 19.5 MHz is covered by the 10 plug-in modules.
The covered frequency bands
are shown in orange. None of the plug-ins have overlapping frequencies, and there
are several significant gaps in the coverage.
|
|
The receiver is aligned in such a way that the tuning knob covers
a 1 MHz frequency band, which corresponds to a display reading between
000 and 999 . The diagram below shows the values when using plug-in 3,
which means that 000 corresponds to 6.800 MHz and 999 corresponds
to 7.799 MHz. This is the red part of the diagram.
In practice, it is possible to tune
outside of the upper and lower limits by several tens of kHz, although this
will be different for each receiver.
In our case, with had approx. 50 kHz of extra tuning space at the lower
edge of the band, and approx. 60 kHz at the upper edge. Note however,
that the display wraps 999 ⇆ 000 at both ends of the scale.
This means that a reading of, say, 035 at the lower edge (6.835 MHz)
has a different meaning than the same reading of 035 at the
upper edge (7.835 MHz) of the tuning scale.
|
| # | From | To | Size | Crystal | |
|
|
| 1 | 3.0 MHz | 4.0 MHz | Large | 29.0 MHz | |
| 2 | 5.7 MHz | 6.7 MHz | Large | 31.7 MHz | |
| 3 | 6.8 MHz | 7.8 MHz | Large | 32.8 MHz | |
| 4 | 7.9 MHz | 8.9 MHz | Large | 33.9 MHz | |
| 5 | 9.1 MHz | 10.1 MHz | Large | 35.1 MHz | |
| 6 | 11.4 MHz | 12.4 MHz | Large | 37.4 MHz | |
| 7 | 13.0 MHz | 14.0 MHz | Small | 39.0 MHz | |
| 8 | 15.5 MHz | 16.5 MHz | Small | 41.5 MHz | |
| 9 | 16.9 MHz | 17.9 MHz | Small | 42.9 MHz | |
| 10 | 18.5 MHz | 19.5 MHz | Small | 44.5 MHz | |
|
|
The FLE receiver was developed for stand-alone use, and works completely
separate and independent from an (optional) transmitter. It is known however,
that it was sometimes also supplied as part of a complete spy radio station.
Below are the currently known configurations.
|
The FLE receiver was initially designed for stand-alone use by agents abroad,
for the reception of Base-to-Agent communication on short-wave radio (HF)
between 3 and 19.5 MHz.
It was generally supplied in
a yellow rubber-like foam container with separate compartments for each of
the parts, as shown in the image on the right.
In the container are the receiver, 10 plug-in units, antenna wires,
a miniature earphone and a battery adapter.
|
|
|
The FLE receiver was also supplied as a key component of the
WSA-1 spy radio set. In that case it was not supplied in a foam
container, but pre-installed as part of the WSA-1's concealment.
Furthermore, only the relevant plug-ins were supplied in such cases.
The image on the right shows an example of such a concealment.
➤ More information
|
|
|
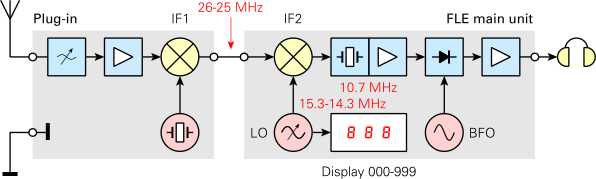
Below is the block diagram of the FLE receiver, based on our own measurements
on a working FLE receiver with plug-in number 3 (6.8-7.8 MHz) and a 7 MHz input
signal (1 kHz AM-modulated). It should be noted that none of the plug-ins
contains any active component.
That means no transistors and, hence, no power supply.
Instead, all active parts (amplifiers, oscillators and mixers)
are held inside the main receiver body.
Only the crystal for the first oscillator is in the plug-in.
The input is first matched to the antenna network, after which the signal
is extensively filtered in a bandpass filter. It is then supplied to the
1st mixer (IF1) which is housed inside the receiver. In the IF1
mixer, the signal is down-converted from the IF1 oscillator which
is also part of the receiver, although the actual crystal
is held inside the plug-in. The crystal frequency is chosen
such that the output of the IF1 mixer is always (i.e. for all plug-ins)
in the 26-25 MHz range.
The 26-25 MHz signal is filtered and amplified, before it is applied to
the 2nd IF mixer, where it is mixed with
the 15.3-14.3 MHz signal from a highly stable
Variable Frequency Oscillator (VFO) with permeability tuning.
This results in a 10.7 MHz IF2 signal that is passed through a crystal
filter and amplified, after which it is applied to a standard combined
AM/FM-IF demodulator IC. 1
The audio output from this IC is then amplified to
earphone level and delivered to the earpiece.
Although the VFO is built around a highly stable LC-circuit with
permeability tuning, such free-running circuits are always sensitive to
(ambient) temperature variations. To ensure that the receiver is tuned
exactly to the desired frequency, it features a built-in digital frequency
counter. The 15.3-14.3 MHz signal from the VFO is down-converted from
a 16.3 MHz crystal frequency, resulting in a 1.000-1.999 MHz signal,
which is applied to a frequency counter. As only the kHz digits are
shown (the MHz digit is omitted), this results in a readout between 000
and 999 .
|
 |
-
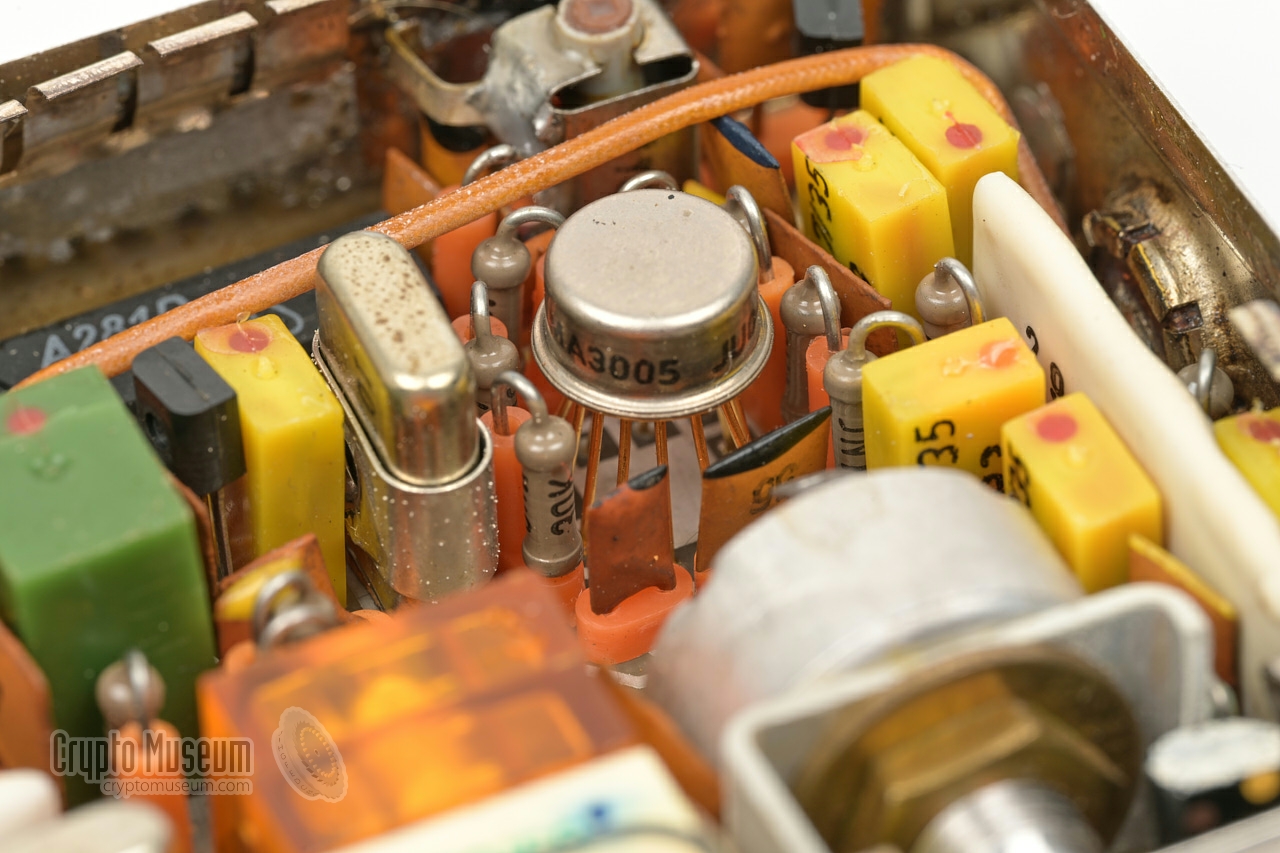
This is an A281D integrated circuit (IC) — the DDR equivalent of the
Siemens TAA981 [a].
|
When the receiver was supplied for stand-alone use, it came in a yellow
rubber-like foam container that measures 107 × 215 × 215 mm.
The total weight of the kit is less than 2 kg.
In this container, each part has its own dedicated space.
The compartments for the 10 plug-in units are numbered (1-10).
The serial number of the kit is printed on the outside of the
container.
|
|
|
The actual receiver measures 154 × 75 × 20 mm and weights 300 grams.
It can only work when one of the plug-ins is attached at its left side,
and a standard 9V battery at its right side.
The plug-ins are designed in such a way, that they form one unit with
the receiver. Depth and hight of the enclosures are identical.
➤ Look inside the receiver
|
|
|
The first six plugs-ins (1-6) measure 20 × 45 × 67 mm and cover the frequency
range 3-12.4 MHz. These are the large plug-ins. Note each plug-ins convers
a 1 MHz range only, which means there are gaps between the plug-ins.
When the FLE receiver was used with the WSA-1 spy radio station,
these were the only six plug-ins that were supplied.
➤ Overview of plug-ins
|
|
|
The higher frequency plugs-ins measure just 20 × 24 × 60 mm and cover the
frequency range 13-19.5 MHz. Like with the large plug-ins, each plug-in
covers just 1 MHz, which means that the frequency coverage is not contiguous.
➤ Overview of plug-ins
|
|
|
|
The FLE receiver was supplied with a standard dynamic earphone, which
terminates in a 2.5 mm jack plug. The earpiece must be connected to the
2.5 mm jack socket at the right end of the front panel of the receiver.
|
|
|
Two short pieces of wire were supplied on a plastic carrier.
The long wire should be used as the antenna, and must be connected to the
antenna terminal on the plug-in.
The short wire can be used to connect the ground terminal of the plug-in
to ground.
|
|
|
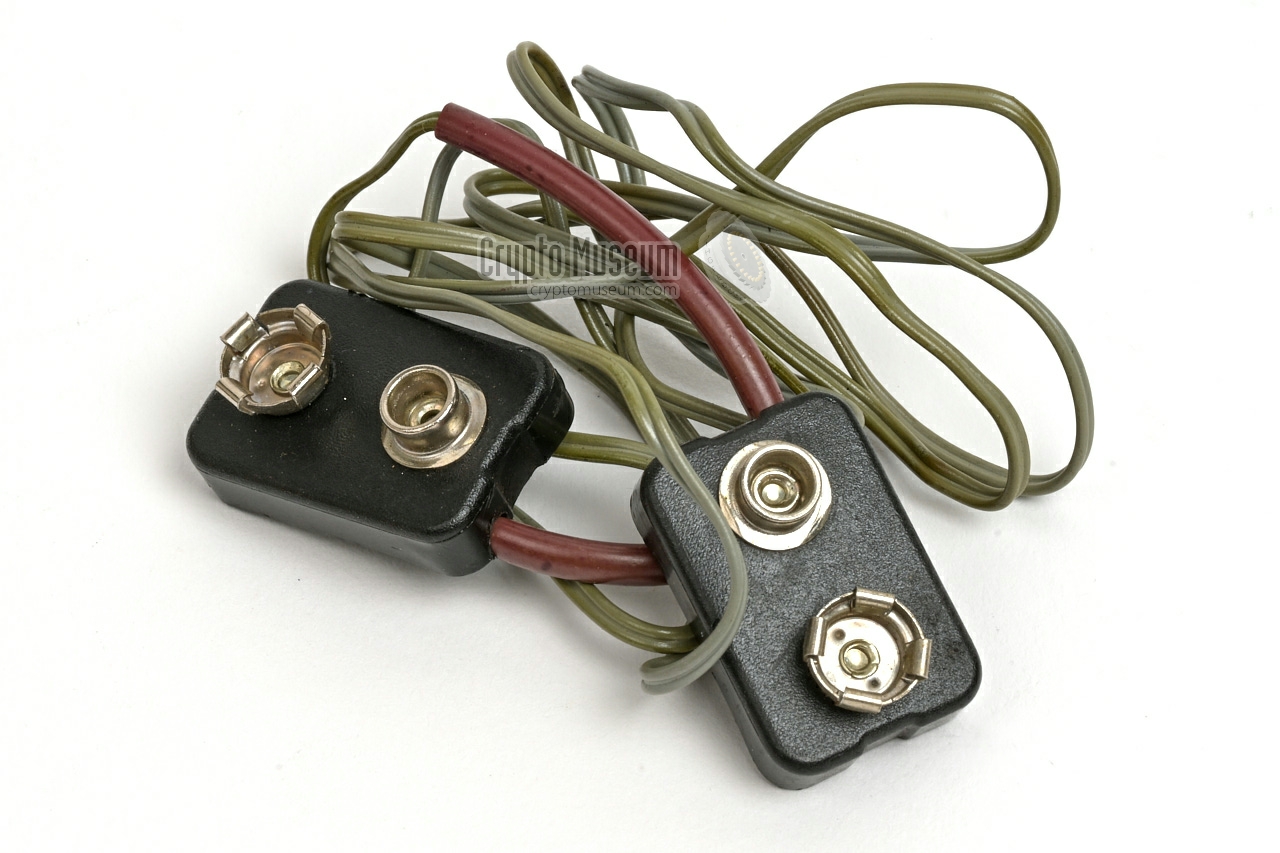
A battery extension cable was supplied for use of the receiver with detached
battery. This is particularly usefull when powering the receiver from two
4.5V flat-pack batteries (3LR12), using the battery adapter below.
The battery extension cable consists of two cross-connected 9V battery
terminals.
|
|
|
By default, the receiver is powered by a standard 9V PP3-size battery.
As an alternative, it is also possible to power it from two standard 4.5V
flat-pack batteries (3LR12).
In that case, the adapter shown in the image on the
right must be used to connect the batteries in series.
When using the adapter, the battery extension cable (above) should be
used to connect it to the receiver.
|
|
|
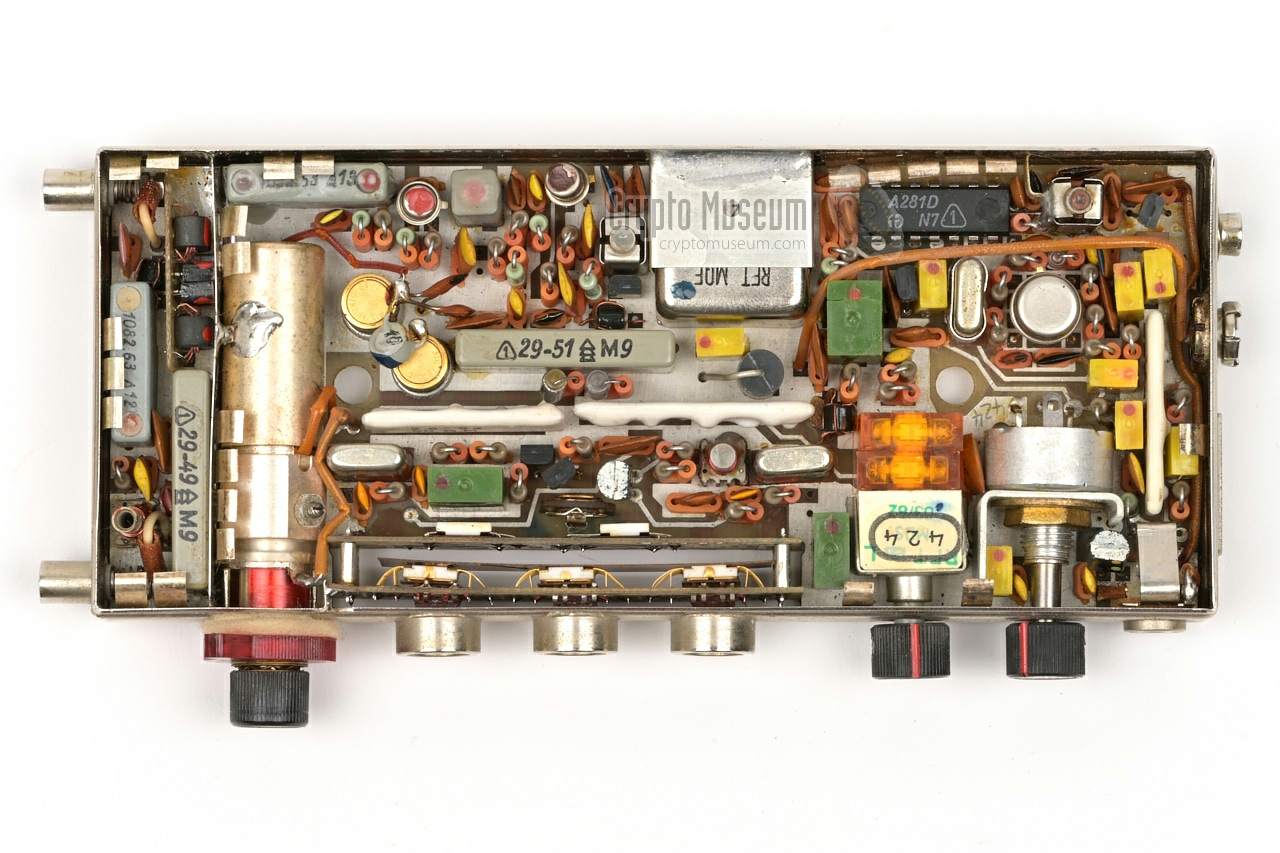
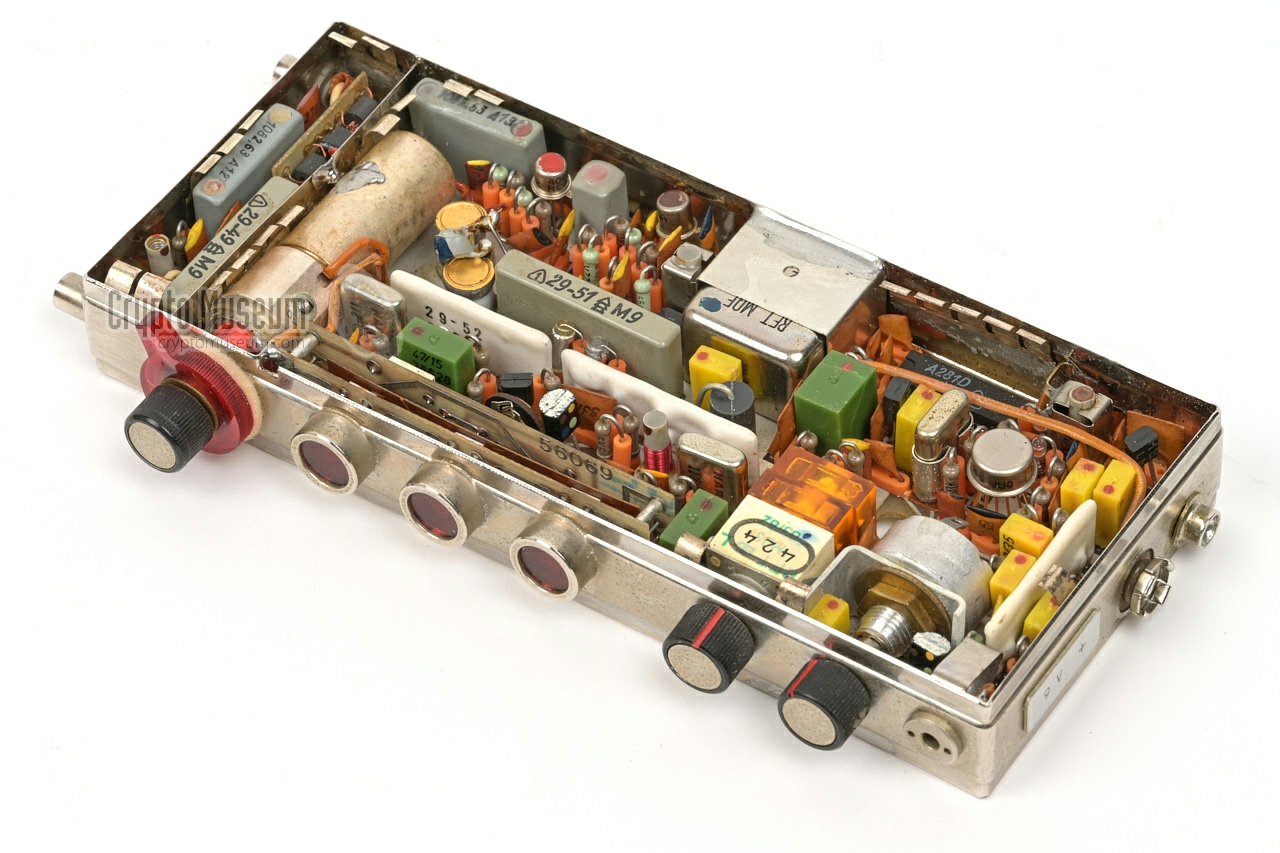
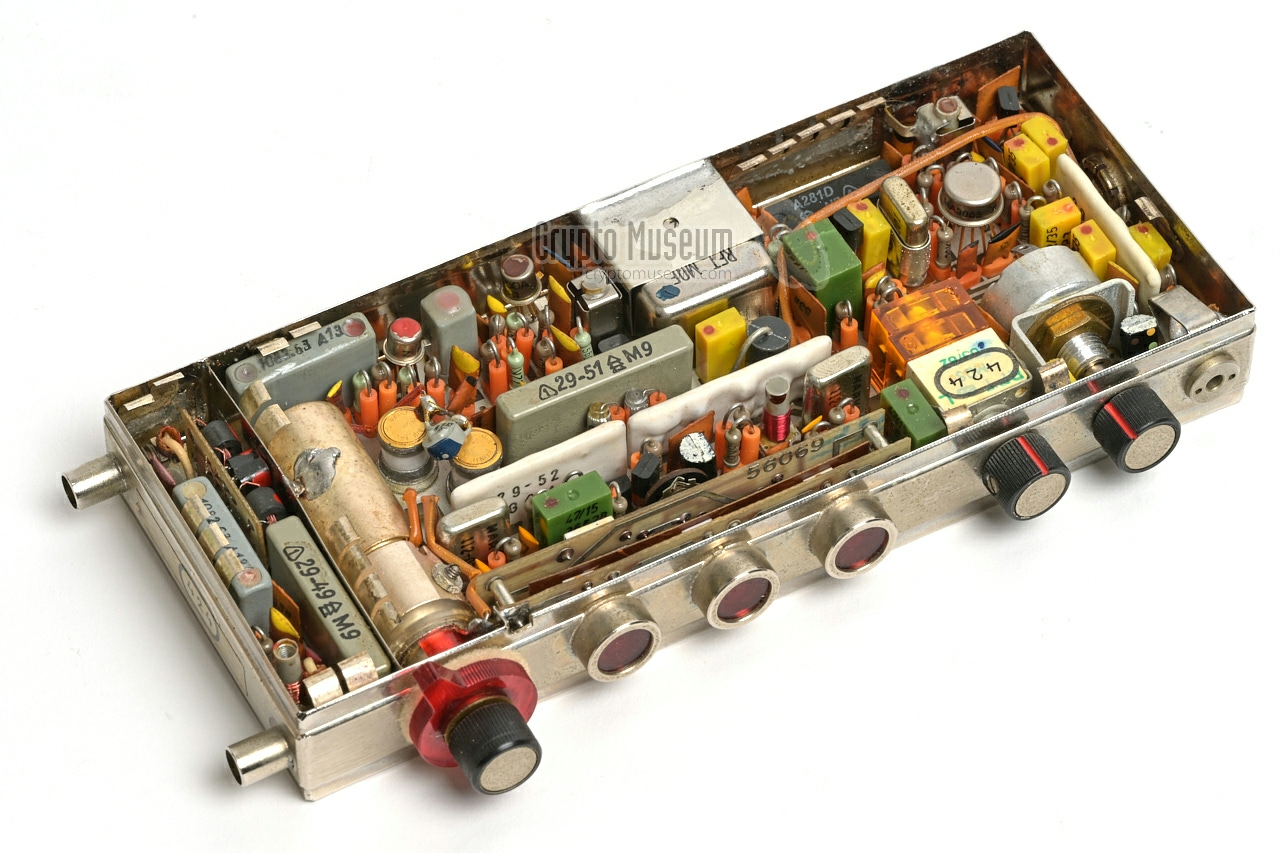
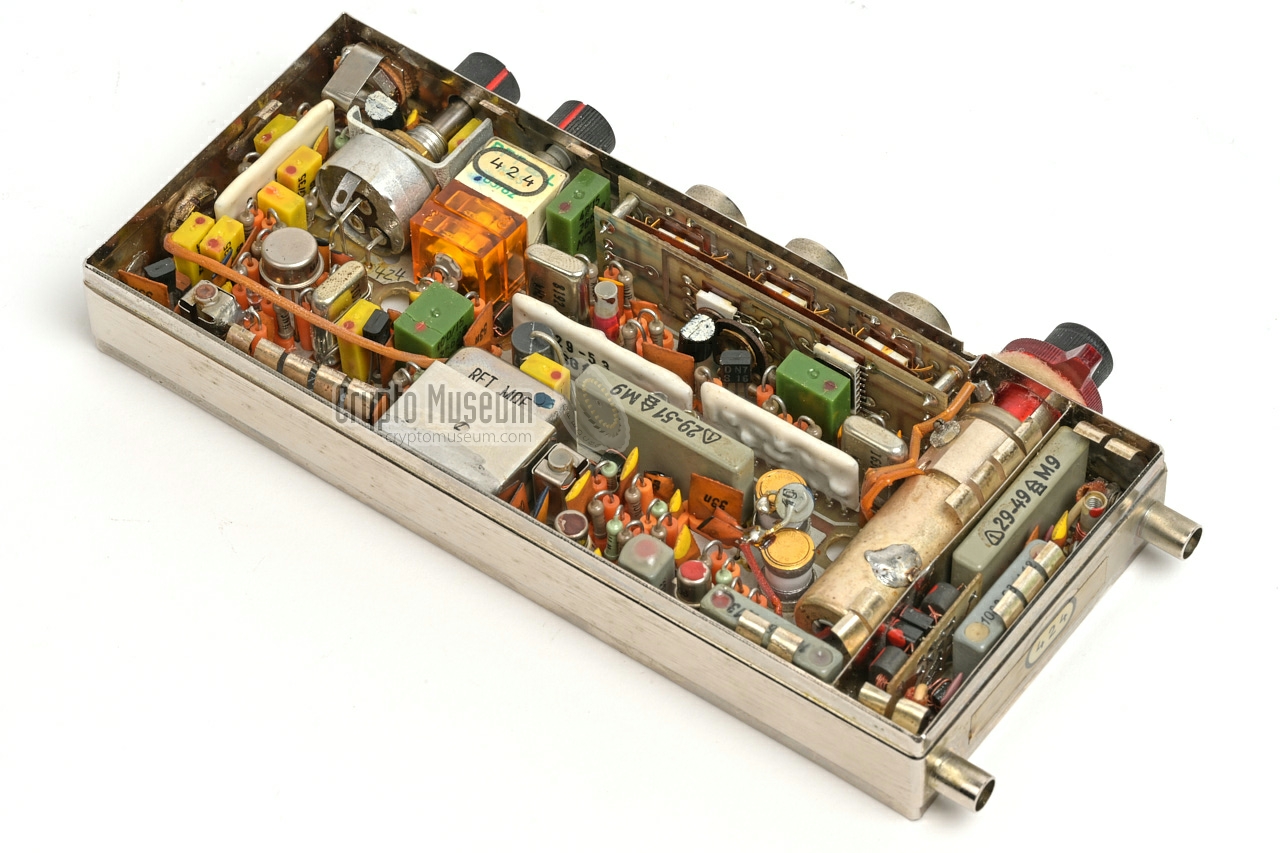
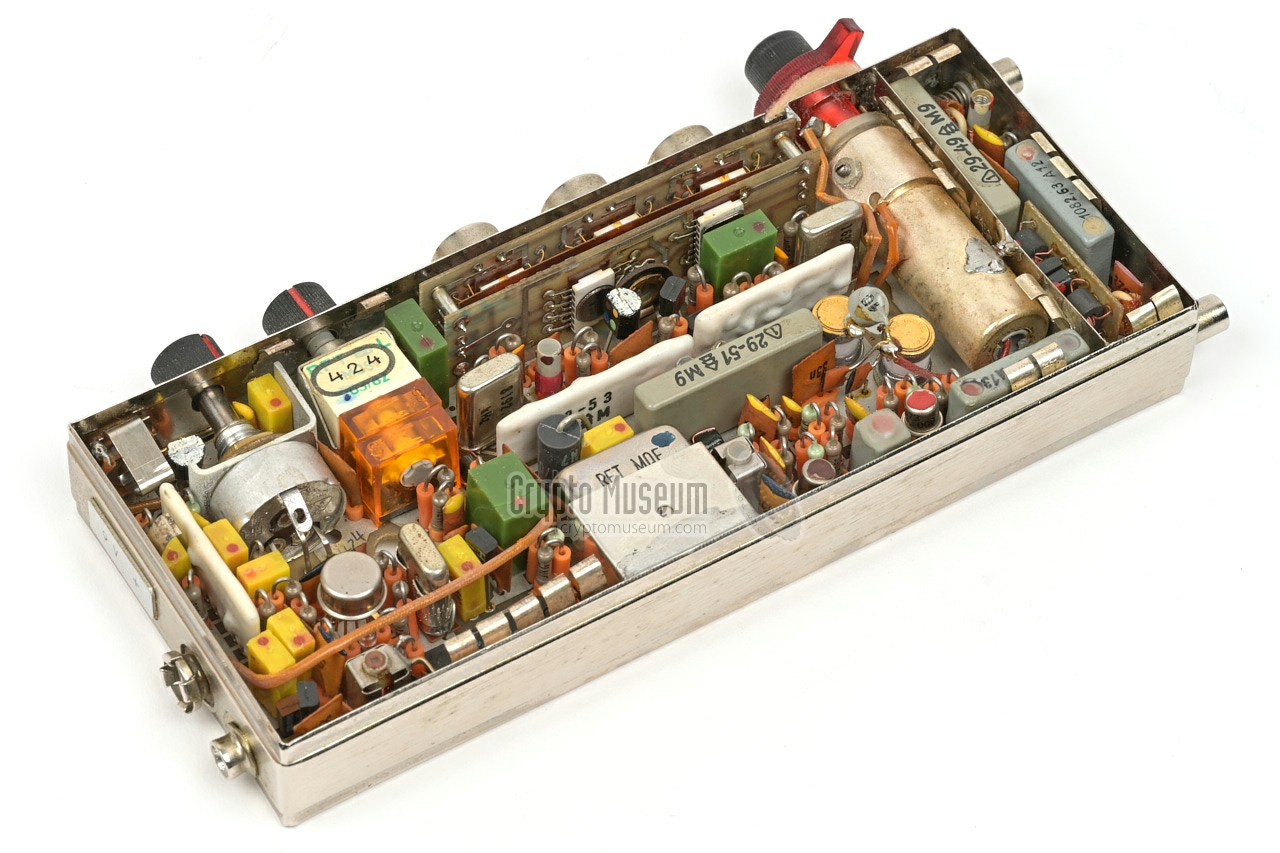
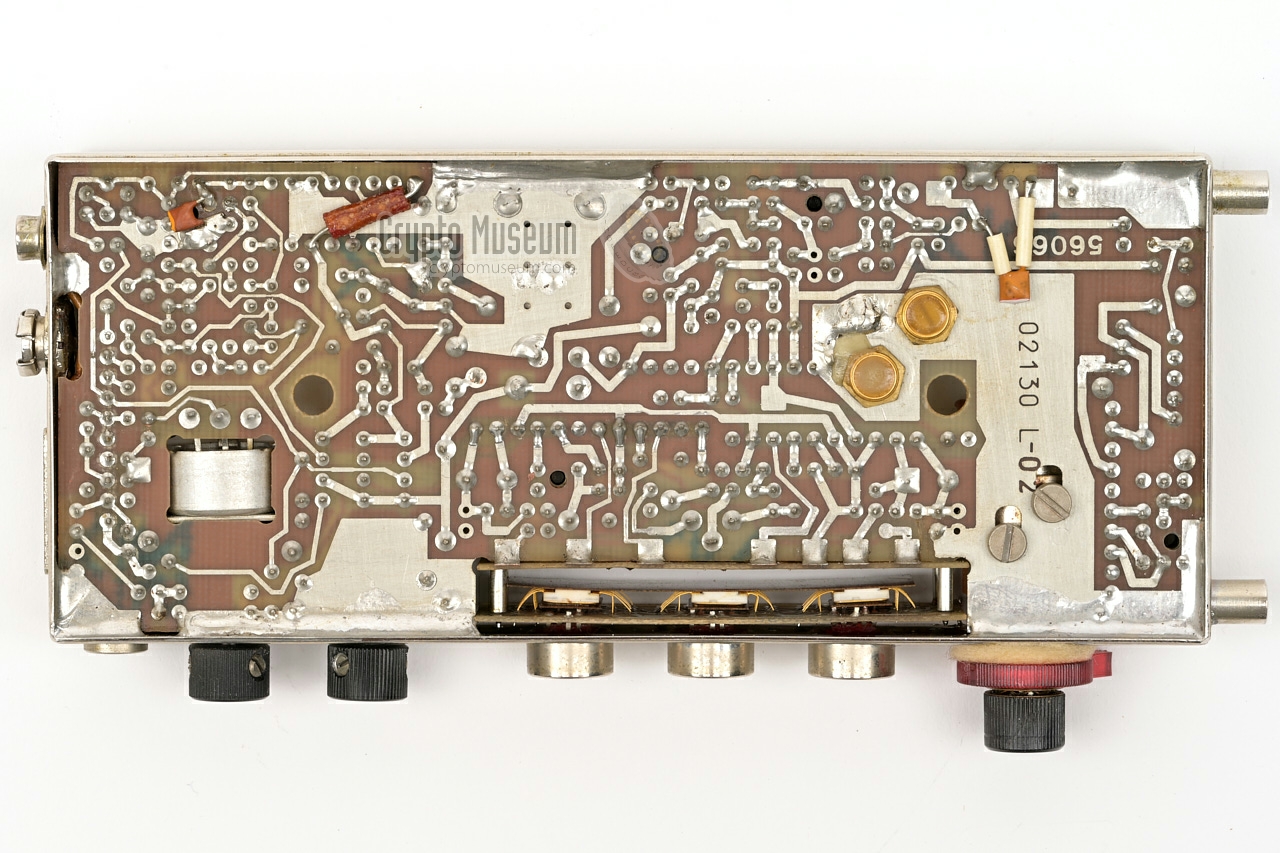
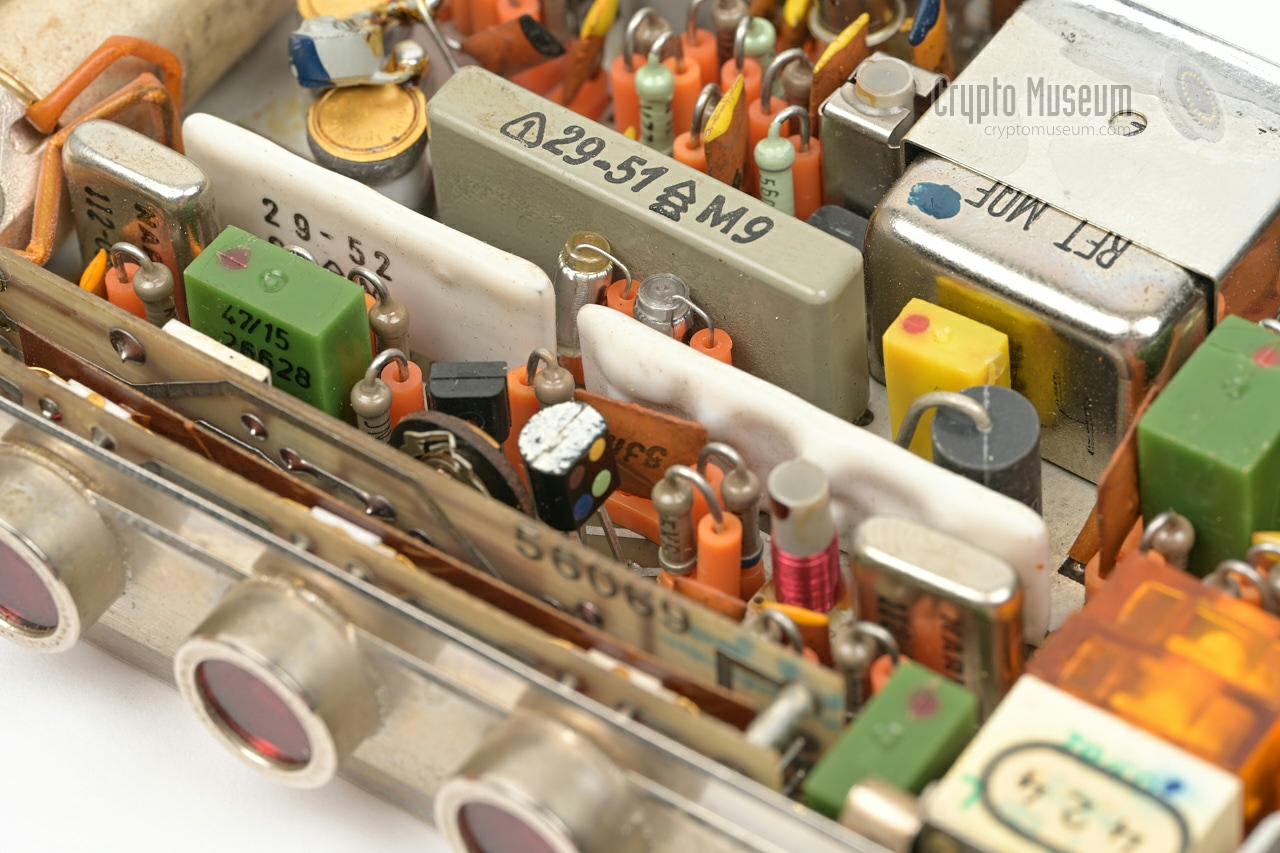
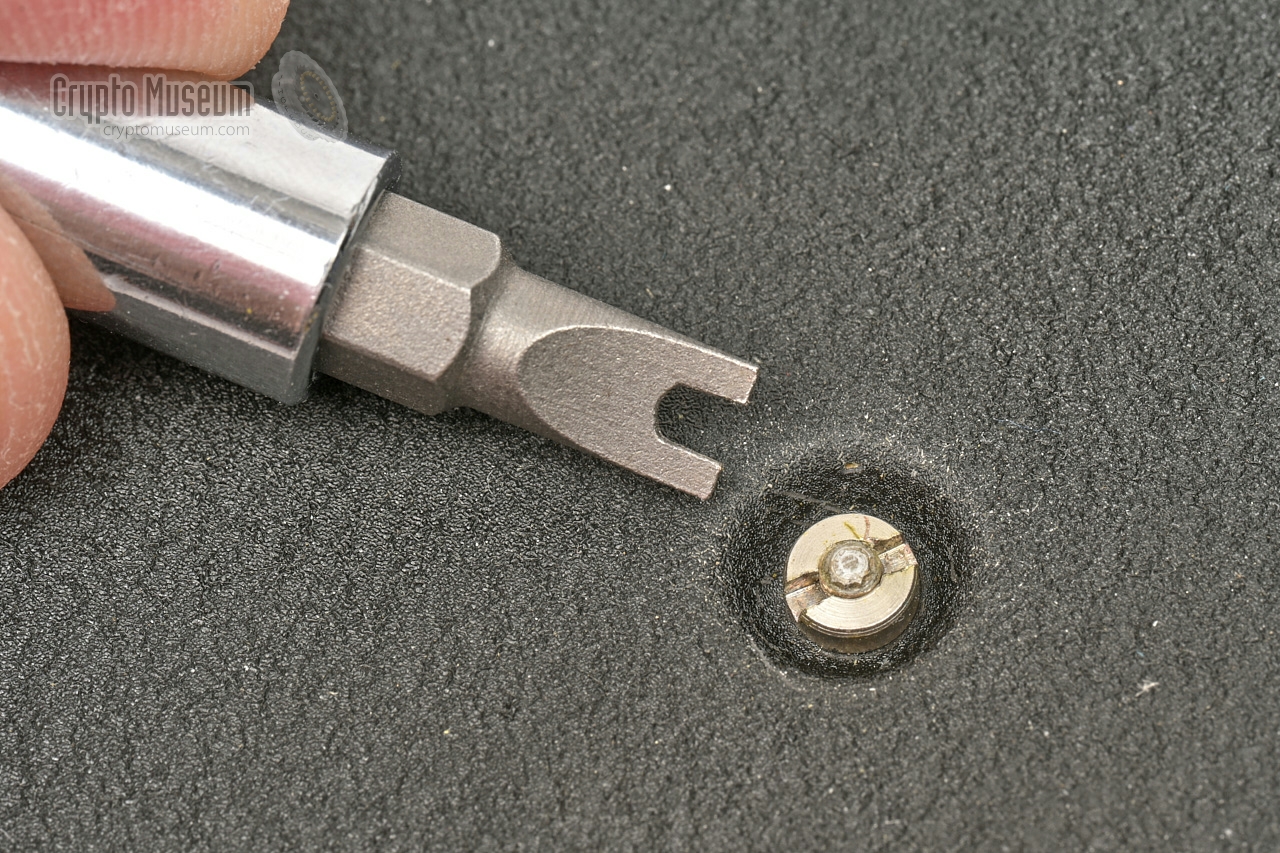
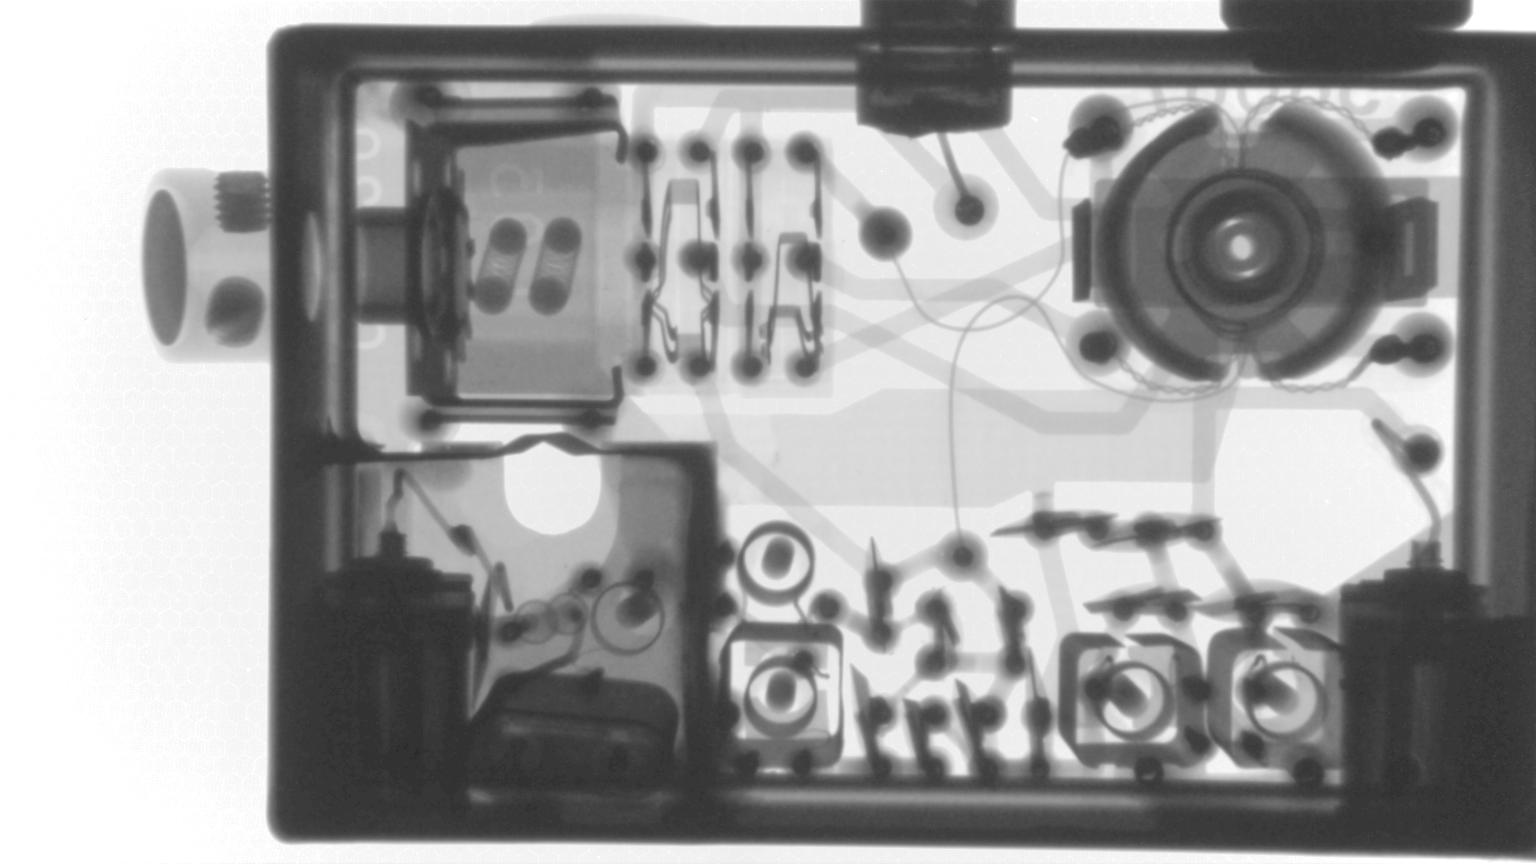
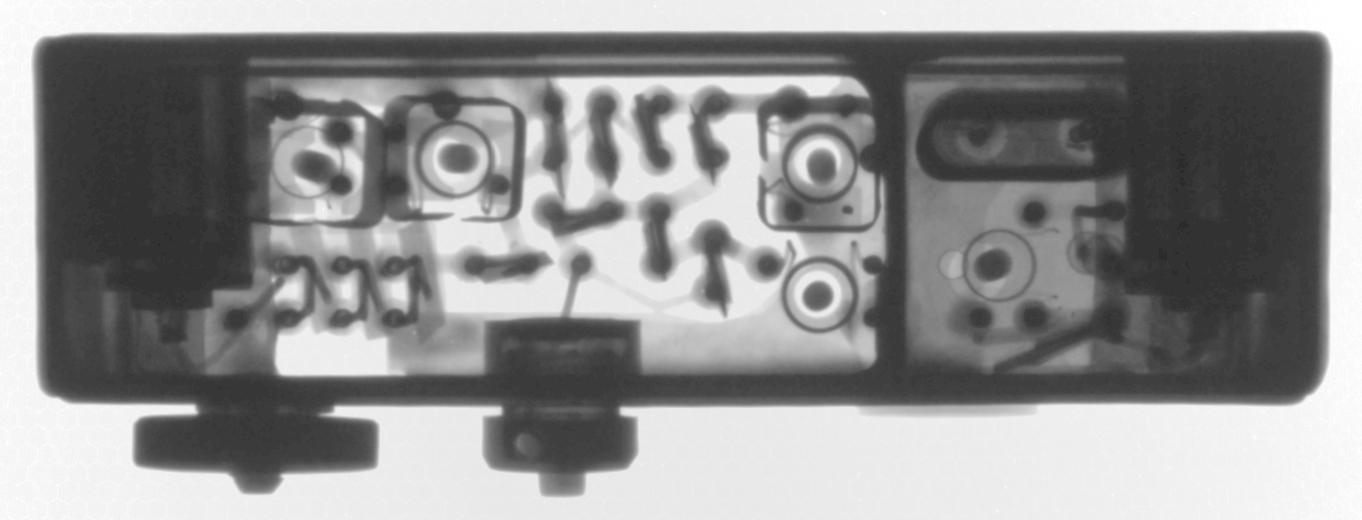
The receiver is housed in a rectangular metal enclosure that
consists of a metal frame that holds a single printed circuit board
(PCB). The PCB is
soldered to the frame in several places.
At the top and bottom are metal panels that are held together by
safety nuts
at the bottom. After removing the two safety nuts
from the bottom, the
upper and lower case panels can be removed.
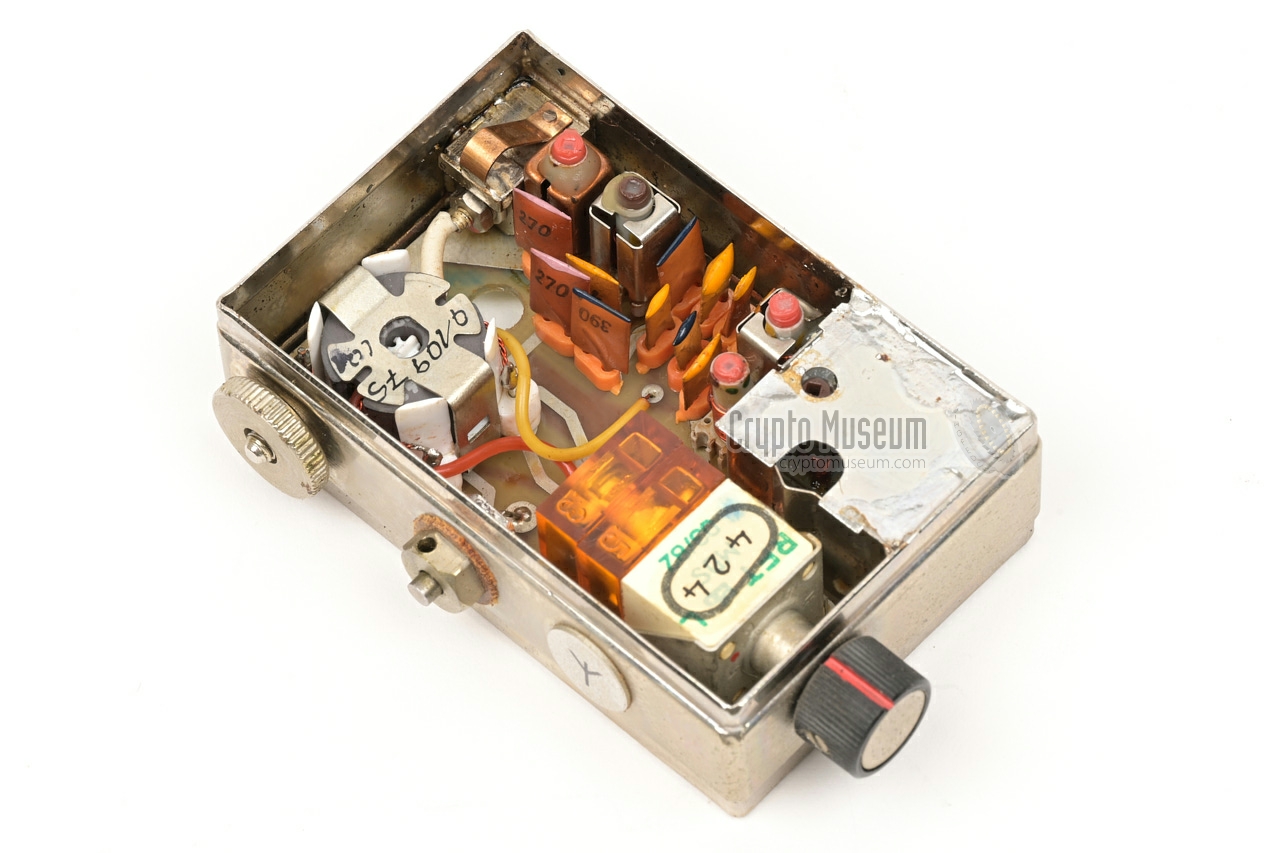
This exposes the receiver's interior as shown in the image below.
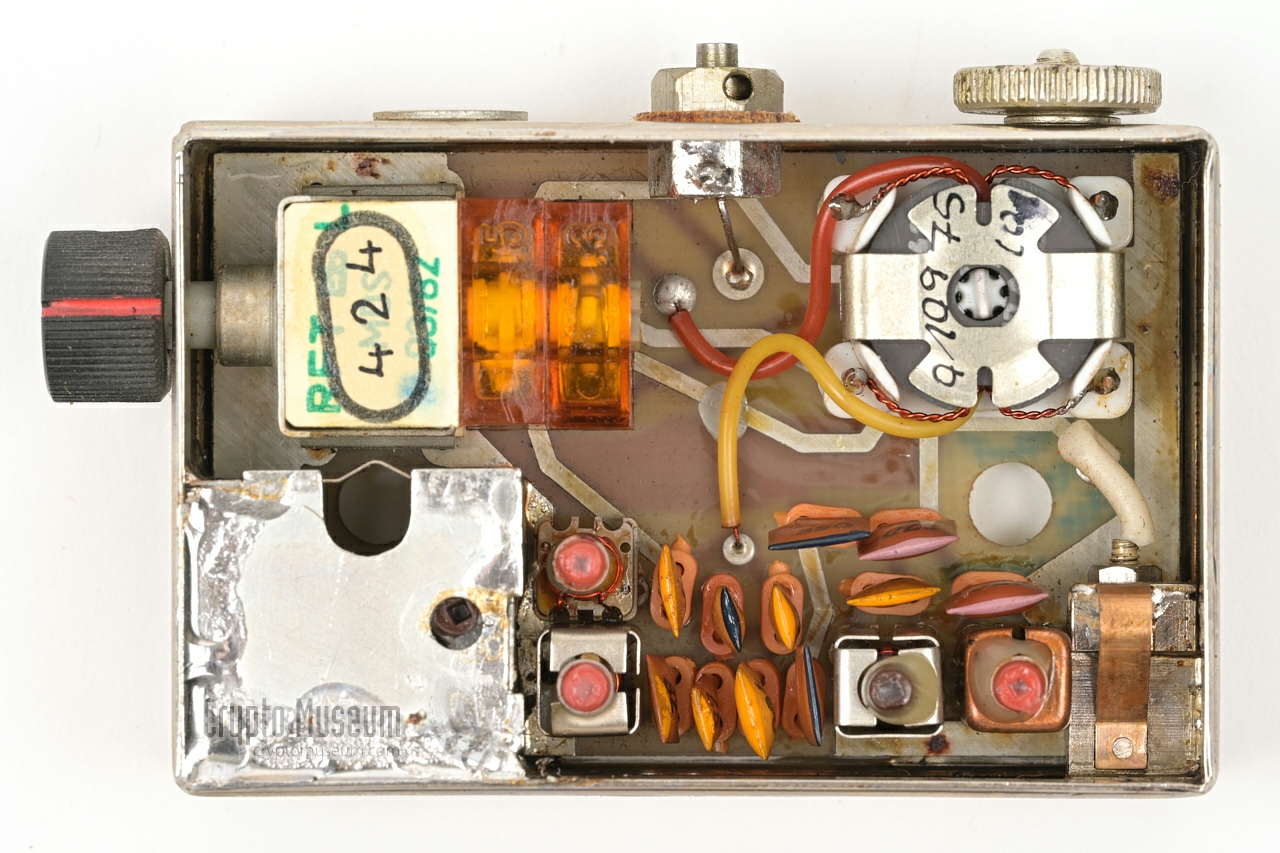
At the left side is a narrow shielded compartment in which the
HF pre-amplifier, the 1st oscillator and the 1st mixer are located
(IF1).
Note that the crystal for the IF1 oscillator (different for each band)
is held inside the plug-in unit.
The output of the 1st mixer (IF1) is always in the 26-25 MHz range,
regardless the selected plug in. After filtering and amplification,
this signal is fed to the 2nd mixer (IF2), where it is mixed with
a signal from the VFO in the range 15.3-14.3 MHz. The VFO is
built around a tuned LC-circuit that consists of a front panel-operated
inductor and two adjustable capacitors. The advantage of this so-called
permeability tuning is that it is less sensitive to temperature
variations, and that it is virtually linear over the entire VFO
tuning range. The output from the IF2 mixer is at 10.7 MHz, which
is first filtered in a crystal filter and then passed to a regular
AM/FM-IF chip that directly produces the AF output.
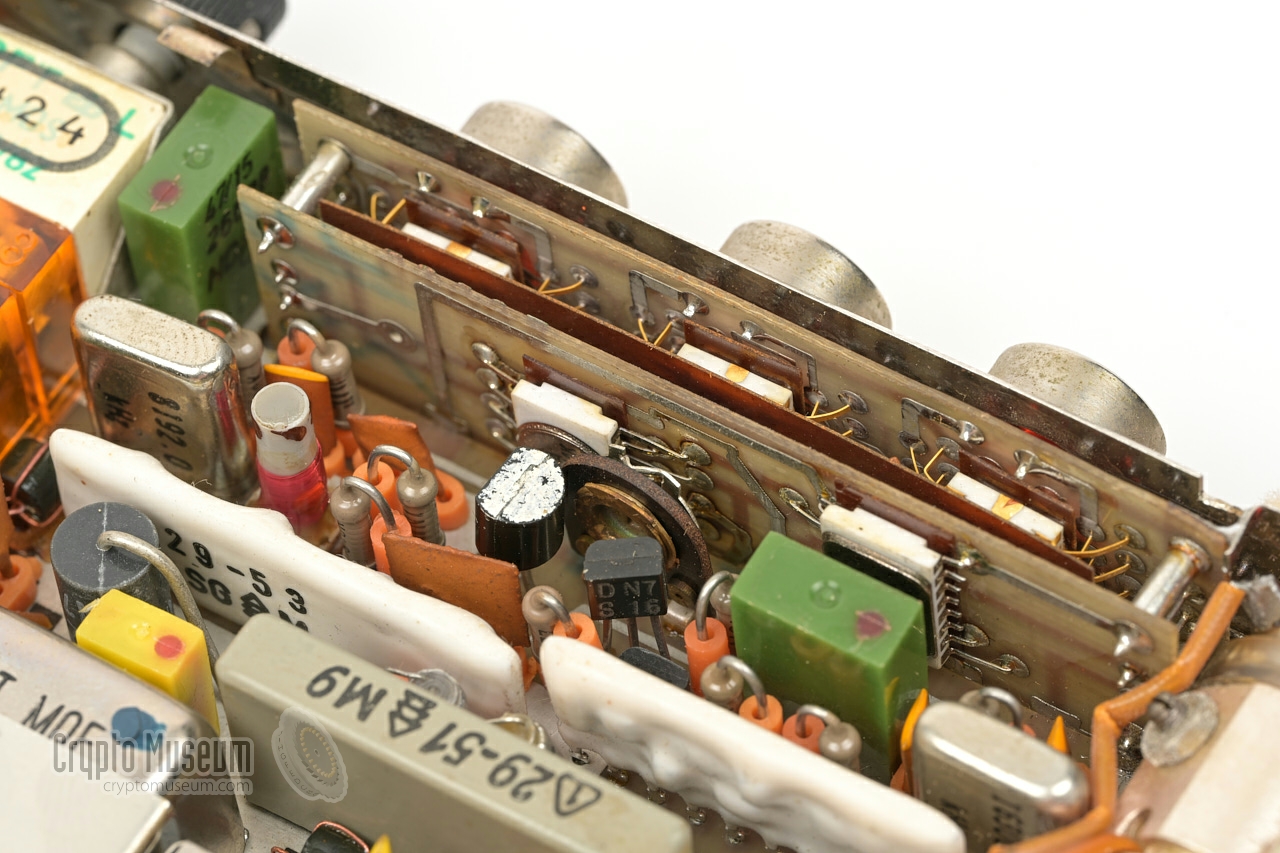
This chip, an A281D, is an Eastern-Bloc copy
of the Siemens TAA981 [b].
The AF signal is then amplified to earphone level by a hybrid amplifier
circuit at the far right.
A significant part of the interior is taken by a built-in frequency
counter, which is responsible for the 3-digit readout at the front panel.
The signal from the VFO (15.3-14.3 MHz) is down-converted from a 16.3 MHz
crystal frequency, producing an output in the range 1-2 MHz. This signal
is then used as the input of the frequency counter (1.000-1.999 MHz).
Since only the kHz digits are connected to 7-segment LED displays,
this results in a 3-digit readout at the front panel.
|
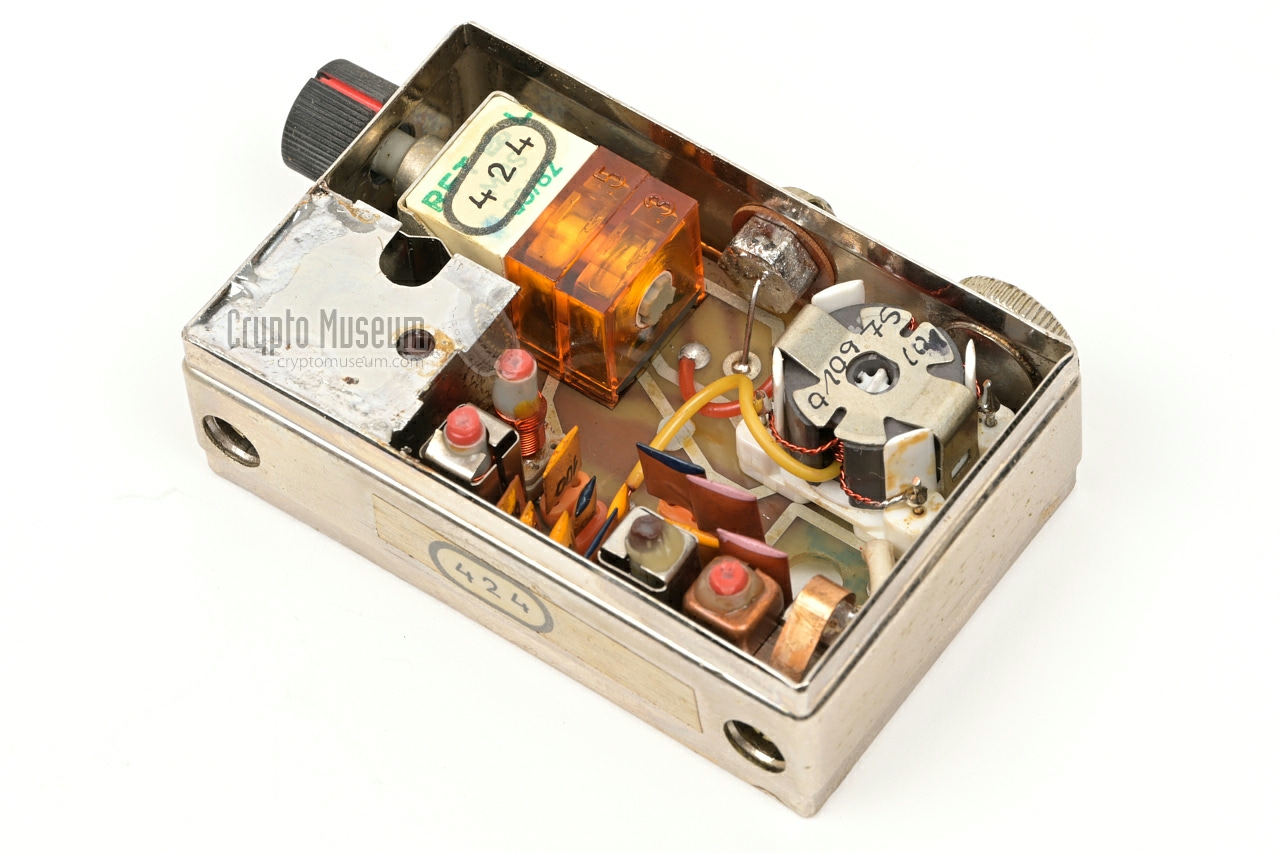
The basic construction of all plug-ins is identical, although the
physical size differs. The image below shows the contruction of
one of the larger plug-ins. Directly connected to the antenna is
a matching transformer that is used in combination with a multi-position
rotary switch at the front panel. It should be set for maximum signal,
but can also be used as attenuator for strong signals.
Also present is a bandpass filter of which the output is available
on the rearmost coaxial socket.
In one corner is a shielded compartment which contains a crystal that
is specific for the selected band. This compartment is not connected to
anything else in the plug-in, but is available on the frontmost coaxial
socket. It can be fine-tuned with an inductor.
The crystal is connected directly to the 1st oscillator, which is held
inside the receiver. The crystal frequency (different for
each plug-in) is chosen such that the
output of the 1st mixer (IF1) is always in the 26-25 MHz range.
|
When we received our FLE receiver in July 2026, it was in unknown condition.
Although the kit was complete, clean and in pristine condition, we didn't
know whether it was still operational. After a first inspection of the interior,
a battery was connected to the terminals at the right side of the device.
After setting the MODE-selector to (f), the display showed a value, which
could be altered by turning the tuning knob. Setting the MODE-selector to
(3) or (1) did not yield an AF signal in the earphone however, but it
soon dawned that this was caused by oxidized contacts in the jack socket.
After wiggling the earphone's jack plug several times, the AF finally
kicked in.
Testing the device on amateur radio frequencies in the 40 m band,
immediately yielded several morse signals at frequencies between
7.035 and 7.100 MHz with a good quality tone.
All in all, the receiver worked out-of-the-box and no restoration
appeared to be necessary, which is not bad for a 45+ year old device.
From observing the device, it becomes clear that it is a labour of love,
which reflects the high engineering standards in East-Germany
in the early 1980s.
|
Device Miniature modular HF receiver Purpose Base-to-Agent communication Model FLE Project 32310 Developer OTS Manufacturer OTS/SF Country East-Germany (DDR) Year 1980 [3] Users MfS HV A, OTS/E, NVA Part of Stand alone, WSA-1 (32210) Principle Double conversion superheterodyne Frequency 3 — 19.5 MHz (in 1 MHz steps, with gaps) Sensitivity 1-2 µV Resolution 1 kHz Plug-ins 10 ➤ More IF1 26-25 MHz IF2 10.7 MHz Range ≤ 5000 km Power 9V PP3-size battery (external) Dimensions Complete kit: 107 × 215 × 215 mm (HWD)
Bare receiver: 20 × 154 × 75 mm
Plug-ins (1-6): 20 × 45 × 67 mm
Plug-ins (7-10): 20 × 24 × 60 mm Weight Complete kit: 1910 g
Bare receiver: 300 g
Plug-ins (1-6): 84 g
Plug-ins (7-10): 48 g Quantity 500 (est.)
|
- Receiver 32310 (FLE)
- 10 plug-in units
- Earphone
- 9V battery extension cable
- Adapter for 2 × 4.5V battery
- Wire antenna
|
- 3.0 - 4.0 MHz
- 5.7 - 6.7 MHz
- 6.8 - 7.8 MHz
- 7.9 - 8.9 MHz
- 9.1 - 10.1 MHz
- 11.4 - 12.4 MHz
- 13.0 - 14.0 MHz
- 15.5 - 16.5 MHz
- 16.9 - 17.9 MHz
- 18.5 - 19.5 MHz
|
012 BfV, Germany 138 Detlev Vreisleben, Germany (instructions on case) 341 Featured in [2] 360 Featured in [2] 424 Crypto Museum, Netherlands
|
- Detlev Vreisleben, Information about FLE receiver (32310)
Crypto Museum, 6 July 2026.
- Louis Meulstee, FLE
Wireless for the Warrior Vol. 4, Supplement, Chapter 40.
Version 1.00, November 2015.
- Dr. Schiffel (Major), Jahresarbeitsplan 1982, Teil I, Zielstellung
MfS, OTS/33, 26 August 1981. Page 12.
|
|
|
|
Any links shown in red are currently unavailable.
If you like the information on this website, why not make a donation?
© Crypto Museum. Created: Tuesday 07 July 2026. Last changed: Tuesday, 11 August 2026 - 16:58 CET.
|
|

|
|
|
| |












![WSA-1 spy transmitter and FLE spy receiver in suitcase concealment. Photograph via Detlev Vreisleben [1].](../wsa1/img/wsa1_compl_large.jpg)