|
|
|
|
|

|
|
Enigma Enigma I
Enigma plugboard selector
Enigma Uhr (clock) is an add-on device for an
Enigma-I cipher machine,
developed during WWII and introduced in July 1944 by the German
Air Force (Luftwaffe) in an attempt to improve the Enigma's cipher security.
Manufactured by Konski und Kruger in Berlin (Germany), it
replaces the patch cables of Enigma's plug board (Steckerbrett).
It was broken by the codebreakers at Bletchley Park
a few days after its introduction.
The Enigma-Uhr is also known as Steckeruhr (plug-clock)
and, according to its own serial number shield on the case lid,
as Gerät E.U (device Enigma Uhr).
|
During the course of the war, the Germans made several attempts to
improve Enigma's cipher security, for example by adding
UKW-C (an alternative for the standard UKW-B) and the more
secure UKW-D, a field-rewirable reflector.
In the same vein, the German Luftwaffe introduced the
Enigma Uhr in July 1944 without any prior warning.
Not even hints in intercepted messages.
The first messages encoded with the new device were received by
Bletchley Park (BP) on 10 July 1944 and
had one thing in common:
they all started with a number written out in full
(e.g. dreineun for 39) after which the message would turn into Qwatsch (nonsense). It was immediately clear that the nonsense represented a code
within a code and that different codes were in use, given the fact that different numbers were found at the start of each message.
As far as we know, the Uhr was only used by the Luftwaffe.
It was first seen on the Jaguar and Cricket keys, and
to a lesser extent on the Red key, were it was used together
with UKW-D.
|
|
|
During our exhibition Secret Messages in 2008/2009,
we had an Enigma Uhr on loan from Dutch collector Arthur Bauer
[5] and we were able to have a closer look and take the photographs
presented on this page.
Below are some additional photographs of the Enigma Uhr.
Click any of them to enlarge. For the technical-minded,
the operation of the Uhr is explained in detail below.
The text has been extracted from the History-chapter of
our UhrBox-E instruction manual.
|
The Enigma Steckerbrett (plug board) contains 26 sockets,
one for each letter of the alphabet.
In theory, any number of patch cables could be used on the Steckerbrett,
between none and 13 with the mathematical optimum at 11 cables.
In practice however, most of the German procedures dictated
the use of 10 patch cables at all times.
This meant that exactly 10 pairs of letters were swapped.
The remaining 6 sockets were left empty (i.e. self-steckered).
After setting the Walzen (wheels) to the daily key,
the operator would connect the Steckern (plugs) in the
order given on the key sheet, e.g.:
AZ BN GI KL PC ED QT HV MF JR
This means that a patch cable is connected between 'A' and 'Z',
another cable is connected between 'B' and 'N', etc.
As each patch cable consists of two cross-wired lines,
it simply swaps pairs of letters.
Each Stecker has two pins of different diameters to prevent
inserting them the wrong way around.
The upper pin has a diameter of 4 mm, whilst the lower
one is 3 mm. In the above example the Steckerbrett
'translates' the letter 'A' to 'Z'.
Because the cables are cross-wired, this means that the reverse
is also true, i.e. 'Z' becomes 'A'.
The Steckerbrett is therefore self-reciprocal,
a feature that helped
Bletchley Park
to break the Enigma codes
more easily. It was the principle on which the diagonal board
of the Turing-Welchman Bombe was based.
➤ More about the Steckerbrett
|
|
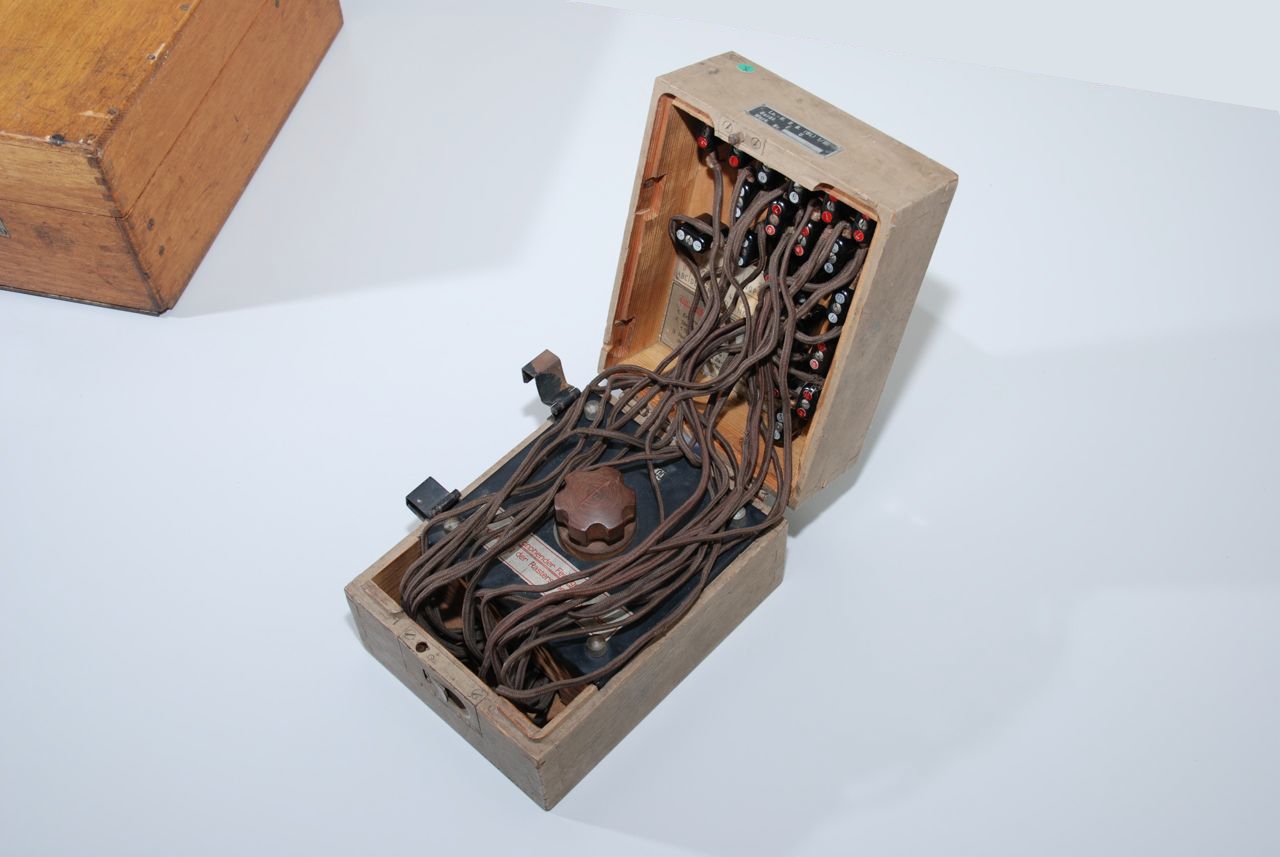
The Uhr is housed in a wooden box that measures 15 x 19.5 x 12.5 cm,
and is painted in sahara beige colour (sometimes referred to as
'sand colour'). The box consists of two halves that are held together
with two metal hinges and a lock that is identical to the one used on the
Enigma case. When opened, the box reveals 20 long textile encapsulated
cables each with a two-pin Stecker (plug) at one end.
Interestingly, the cable enters the Stecker at the top,
whereas a standard Stecker has the cable at the bottom.
The plugs are neatly stored inside the top lid whilst the other side
of the cables 'disappears' into the body of the Uhr.
|
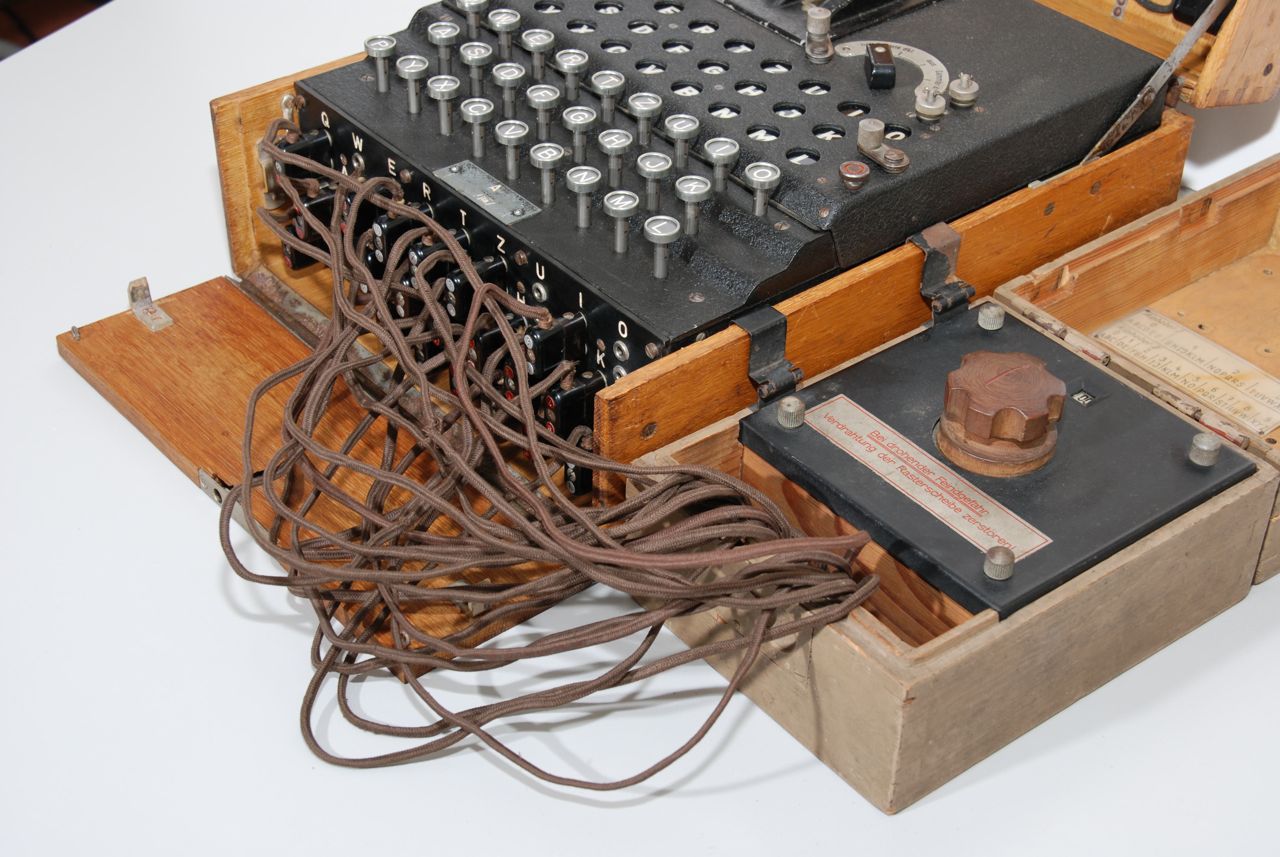
The Uhr has two metal brackets that allow it to be clamped to the right
side of the Enigma. Long cables with 20 Steckern (10 pairs) are
used to connect the Uhr to the Steckerbrett of the Enigma.
It takes the place of the standard 10 patch cables.
A 40-position switch on the Uhr is used to connect the 10 pairs
in a scrambled (but fixed) manner.
The positions are marked 00-39.
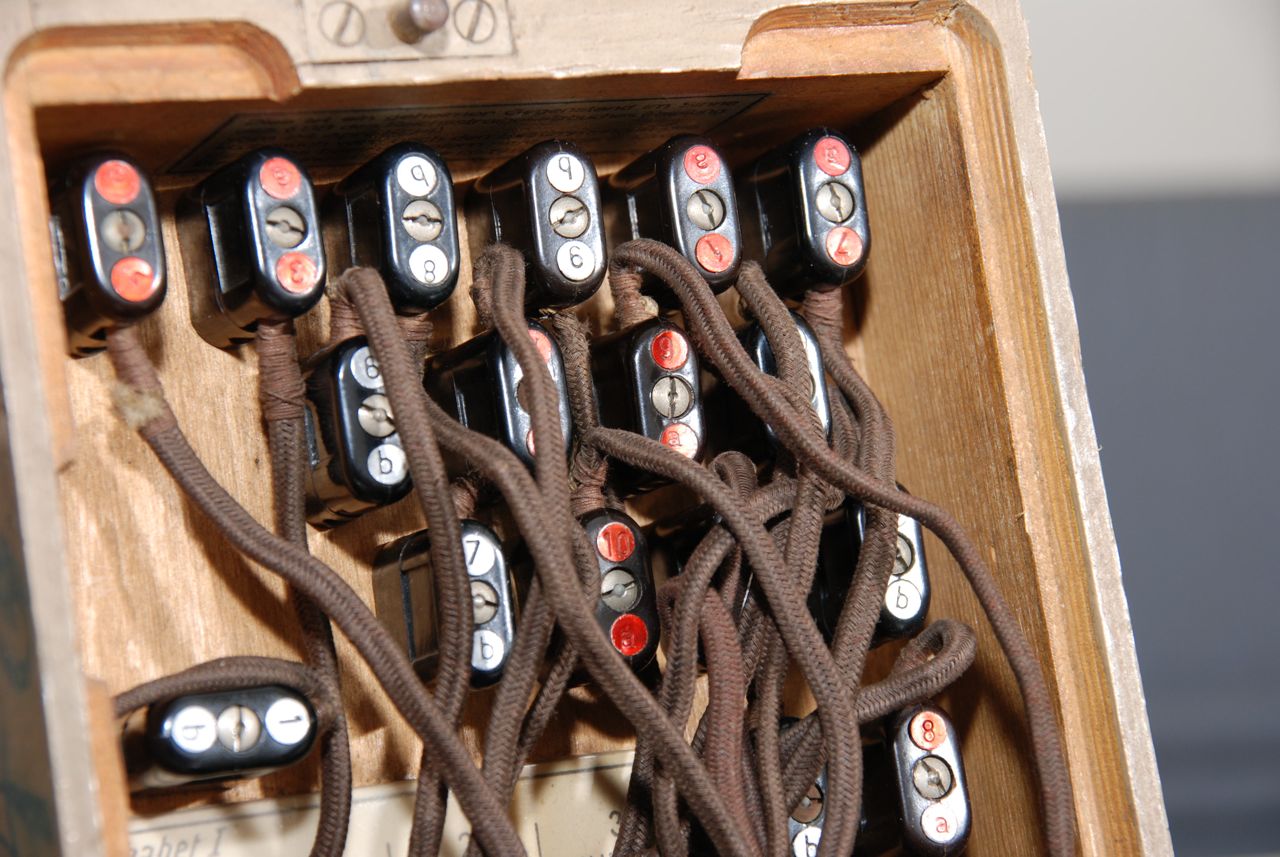
Each of the plugs is marked with a letter ('a' or 'b') and a number (1-10).
Half the number of plugs carries the letter 'a' and are marked
red (a1, a2, a3, ... a10).
|
|
|
|
The other half carries the letter 'b' and are
marked black (b1, b2, b3, ... b10).
The Uhr was set up along with the daily key.
The Steckern in the key were replaced by the Uhr in such a way that
at position 00 it would behave like ordinairy patch cables.
This allowed communication with non-Uhr users.
|
If we take the example above ,
a1 would be connected to A on the Enigma Steckerbrett,
b1 was connected to Z, a2 to B, b2 to N,
and so on, until all 10 connections were made.
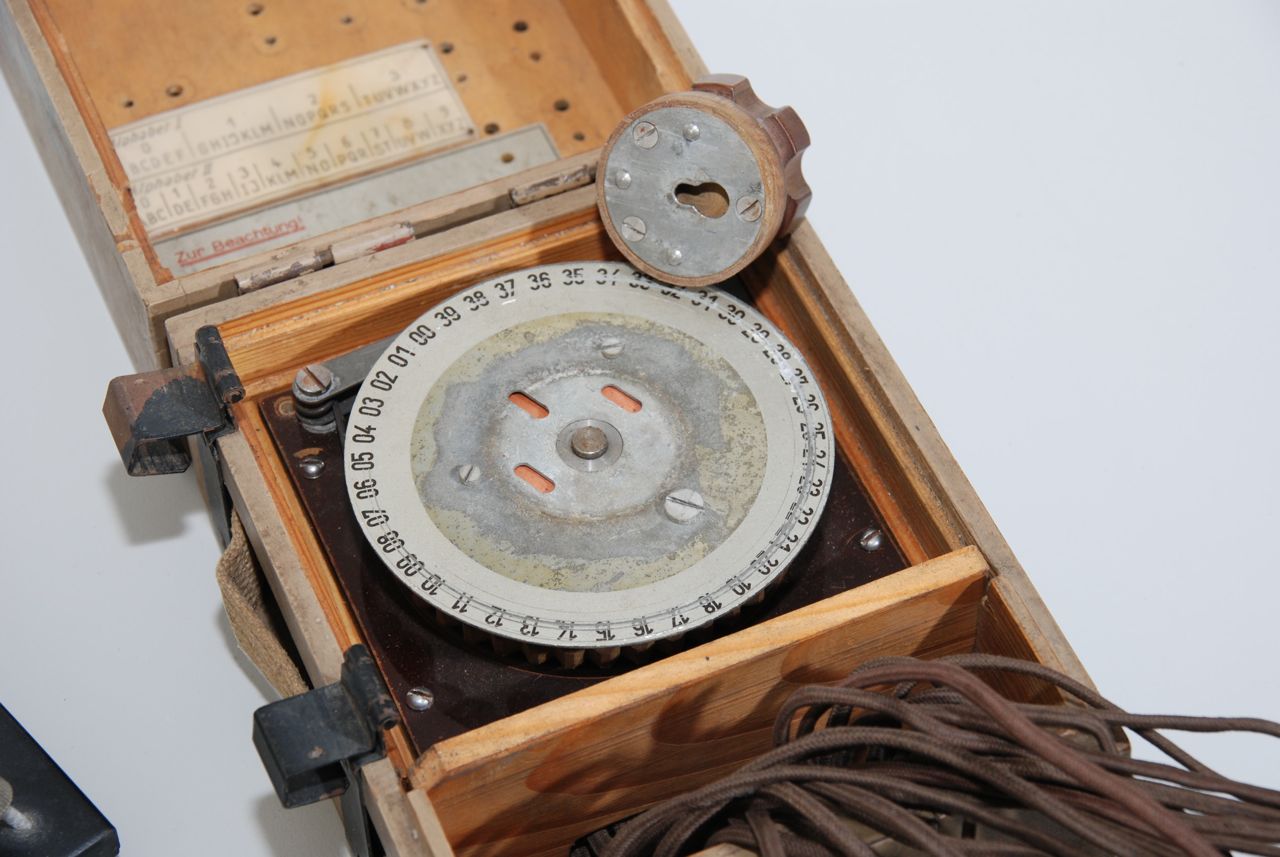
At the centre of the Uhr is a large wooden knob that
allows a rotary switch to be set to any of 40 positions.
The current position can be read through a small window
just above the knob.
The rotary switch is the actual scrambler of the Uhr.
It consists of a large bakelite disc with two concentric circles
of 40 contacts each. Each contact of the outer ring is connected
to one of the contacts on the inner ring by means of a wire that
is soldered between them. The disc has 40 teeth around its perimeter,
allowing 40 positions, and a spring-loaded wheel is used to lock the
disc in its current position. The 80 contacts on the upper side of
the disc are extended to the bottom where they meet the 40
spring-loaded contacts of a static disc. The contacts of the static
disc are wired (at the bottom) directly to the patch cables.
An exploded view of a real Uhr is shown on the right.
At the bottom is a large static Bakelite disc with 40 spring-loaded
contacts that are wired directly to the 20 Steckern (patch cables).
The scrambler disc (shown here without its wiring) lies on top of the
static disc and is held in place by an axle.
A large metal disc with the numbers 00 - 39 on its perimeter
is bolted to the scrambler disc.
In order to guard the scrambler disc against short circuits,
paper insulating material is inserted between the scrambler
disc and the number disc.
A large wooden knob is slotted into the number disc and
allows the scrambler to be rotated into any of its 40 positions.
|
|
|
The images below show the wiring of the Uhr when the scrambler is
set at position 00 (left). To show the effect of rotating
the scrambler disc, we've also shown the wiring when the Uhr is
set to position 03.
Let's first consider the scrambler disc set to 00 (left).
The plugs marked 'a' (red) are all wired to the outer contacts
of the static disc, whereas the 'b' plugs (black) are wired to
the inner contacts. Note that each plug has two pins of different
diameters, to prevent them from being inserted the wrong way around.
The scrambler disc has twice as many contacts as the static disc,
resulting in a rather interesting pattern of connections when the
disc is rotated.
As position 00 is used for compatibility with a non-Uhr Enigma,
it means that at this position the Uhr has to maintain the reciprocity
of the Enigma Steckerbrett.
Plug 1a is wired to 1b (00-06) and 1b is
wired to 1a (04-02). If you look carefully at the drawing below,
you'll see a cross-connection between each a/b pair.
As a result, every 4th position will therefore yield a
reciprocal substitution.
All other settings produce a non-reciprocal substitution.
Now let's consider the effect of rotating the scrambler disc
when the dial is set to position 03 (right).
The wiring of the scrambler disc is shifted 3 positions upwards,
so that contact 03 is now at the top.
Contacts 00 to 02 are wrapped around so that they now appear at the bottom.
In this case 1a is wired to 5b (03-29),
but 5b is wired to 4a (27-17),
which is a non-reciprocal substitution.
The Stecker contacts on the left hand side (red) are ordered
nicely 1...10, whilst the contacts on the right hand side are
in some scrambled order. The reason for this is simple.
If the contacts on the right hand side were placed in the same
order as the contacts on the left (1 ... 10) the wiring of
the wheel would become a lot simpler,
but a number of repeats would occur.
For example, every 4th position would yield the same
substitution as position 00. The order of the contacts
on the right has been chosen carefully,
so that no repeats occur at all.
|
Ciphering and deciphering messages on an Enigma machine is a co-called
reciprocal operation. This means that the entire
process is reversable. If, say, the letter 'E' is enciphered into an 'R',
this means that 'R' would produce 'E' at the same setting of the Enigma.
As a result, the basic setting of the machine for encryption is identical
to the setting needed for decryption.
Due to the fact that the normal plug board is self-reciprocal (letters are
always swapped in pairs) in combination with the way in which the Uhr is
constructed, 10 positions produce a reciprocal substitution
(every 4th position, starting at 00).
The remaining 30 positions produced a non-reciprocal substitution.
It is sometimes suggested that this made the Enigma non-reciprocal too.
However, this is not the case.
The Uhr only makes the Steckerbrett non-reciprocal
(in the same way as an Enigma wheel produces a non-reciprocal substitution),
but the reciprocity of the entire system (i.e. the Enigma as a whole)
is not affected, as that reciprocity is caused by the use of an
Umkehrwalze, or UKW (reflector).
The non-reciprocal nature of the Uhr prevented the use
of Welchman's diagonal board in Bletchley's Bombes.
It didn't however prevent the use of the Bombes themselves,
provided long cribs and strong enough menus were available.
After all, standard Bombes were already used to break Enigma
codes before the diagonal board was introduced.
|
Although in theory the Uhr could have posed a serious threat
to the code breakers at BP, it was broken shortly after its introduction.
After investigating the initial messages,
the code breakers realised that some kind of non-reciprocal
substitution table was used in conjuction with the basic key.
They assumed that 40 substitution tables were used,
as the highest recorded number was 39.
They also noticed that the 6 self-steckered letters on the Enigma
Steckerbrett remained unaltered and that the Uhr affected only
the 20 steckered letters of the key.
Messages between German operators were read,
in which they discussed the use of 'Enigma Uhr'.
This lead to the assumption that the Germans had attached
some kind of external device to the Steckerbrett.
Apparently, some Enigma operators were not aware of the
new procedure and messages were re-sent using the
basic Enigma key (i.e. a re-encodement).
The first break into Uhr was achieved this way and it didn't
take long for the codebreakers to find relationships between settings.
Finally, they were able to predict the effect of all 40 settings,
once a single setting was broken.
The Uhr was sometimes used in conjunction with UKW-D,
another attempt to make the Enigma more secure.
UKW-D was a field-rewirable reflector which,
when used by all Enigma machines,
would have posed a real (if not fatal) threat
to Bletchley Park.
However, UKW-D wasn't distributed widely and was difficult to operate.
It was therefore only used for important messages.
Like with the Uhr, the Germans had to be able to exchange
messages with both UKW-D and non-UKW-D users,
so they mixed messages with and without the devices,
using the same basic key.
This made breaking both Uhr and UKW-D very easy once
the basic key had been broken.
|
On 2 November 1944, the German unit Gefechtsverband Hallensleben
— nicknamed 'Abdulla Fag' because it was too difficult to pronounce —
caused some consternation at BP when it was ordered to use the Enigma Uhr.
During the past month Abdulla Fag had been a solid source of
cribs for the Jaguar key, which BP would hate to lose.
But the situation got worse: once the unit had switched to Uhr,
their messages became completely unreadable.
And when eventually the traffic from other networks using Uhr
also became unreadable, the nightmare was complete.
The Germans had suddenly changed the method of indicating
the Uhr setting, leaving BP in the dark.
Several possible causes were investigated and rejected,
until finally a message was tried on the basic Enigma
key with all 40 positions of the Uhr.
At setting 28 it decoded, but only from the 5th letter onwards.
Apparently the first 4 letters were used as a new indicator.
From repeats, it was discovered that the 4 letters represented
2 bigrams, one for each digit of the Uhr setting.
|
| |
|
|
1st Bigram (for 1st digit)
|
|
|
|
|
| ABCDEF | GHIJKLM | NOPQRS | TUVWXYZ |
| 0 | 1 | 2 | 3 |
|
| |
|
|
2nd Bigram (for 2nd digit)
|
|
|
|
|
| ABC | DE | FGH | I J | KLM | NO | PQR | ST | UVW | XYZ |
| 0 | 1 | 2 | 3 | 4 | 5 | 6 | 7 | 8 | 9 |
|
On one hand, BP was lucky that the Germans hadn't used the 4-letter
code when they introduced the Uhr, since then it might never have
been broken. On the other hand, once it had been broken,
the 4-letter code made things easier for them,
as there was less uncertainty about the position of a possible
crib in a message (spelling out numbers results in a
variable-length text).
|
When exchanging messages with the user of another Uhr,
the operator probably selected a different setting for
every individual message. For a multi-part message,
the operator would use a new setting for each of the parts.
As the setting of the Uhr was 'randomly' picked,
the operator needed a way to inform his counterpart at
the other end. Initially this was done by spelling
out the numbers in full at the beginning of the message
as we've seen elsewhere on this page.
The Germans had quite a lot of trouble with the Uhr
and they even postphoned its use for several months.
On 2nd November 1944 the method of spelling out the
Uhr setting at the beginning of a message was abandoned.
It was replaced by a 4-letter code that was inserted
at the beginning of a message (see the bigram tables above).
|
This 4-letter code was not very sophiticated.
The setting consisted of 2 digits (e.g. '28'),
and each digit was represented by 2 letters (bigram);
a total of 4 letters. For each digit,
the operator picked two letters from the same range.
The reason for encoding each digit twice was probably
to guard against garbles. The bigrams were created from
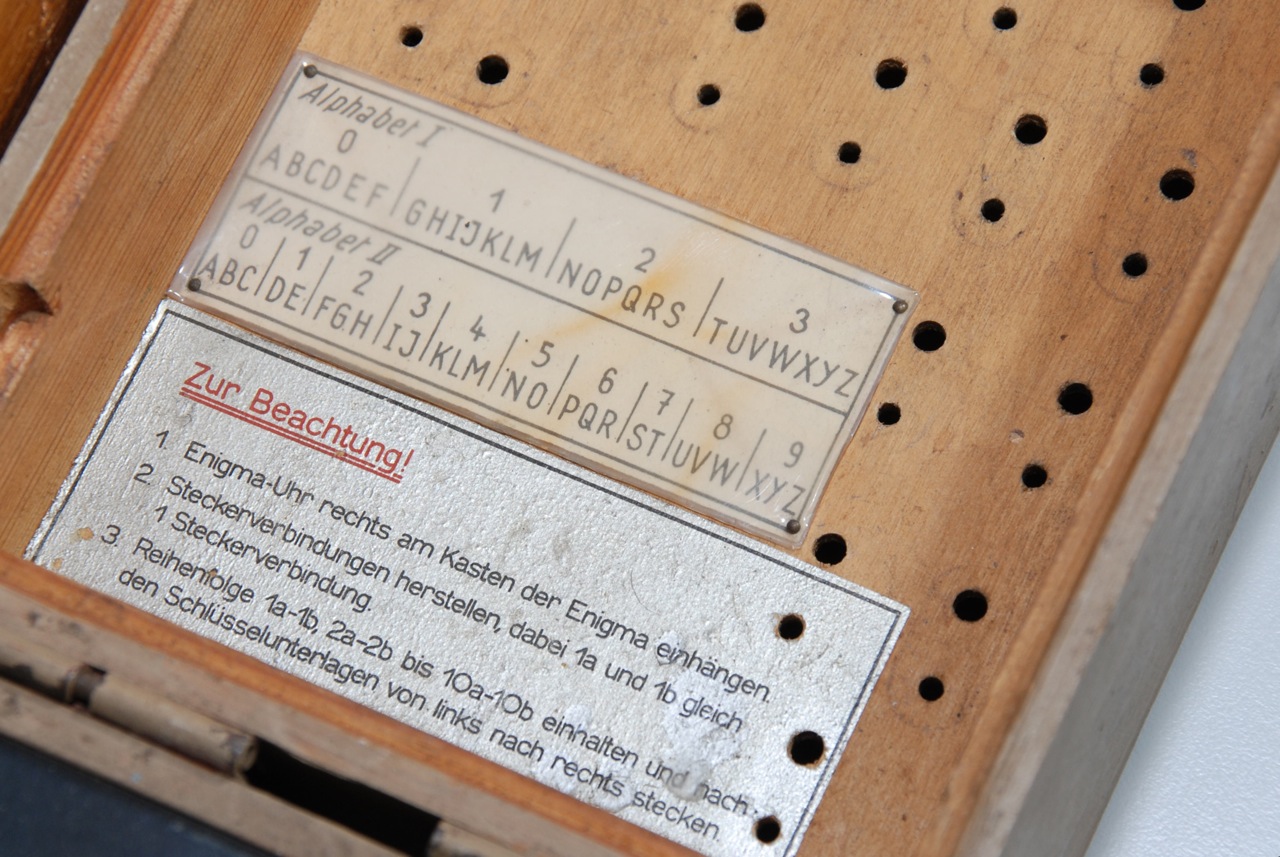
a table inside the top lid of the Uhr.
The first digit was taken from Alphabet I
and the second one from Alphabet II.
For example, position 28 could be encoded
as NSUW,
but also as PRVW.
|
|
|
The image above shows the inside of the top lid of
a typical Uhr. The lowest label (Zur Beachtung)
was screen-printed directly onto the wood, whilst the
bigram table was clearly added at a later stage.
It's a small piece of paper in a plastic envelope,
nailed to the lid by means of 4 small nails.
Click the image for a close-up.
|
Unlike the Enigma machine itself, which is build to the
highest German standards, the Uhr
is of very poor quality.
The box is made of 'cheap' wood and is not as
nice as the Enigma case.
The quality of the spring-loaded contacts on
the static disc is poor and the patch cables are
soldered directly to their springs in such a way
that they easily come off when the Uhr is dismantled.
One possible explanation for the low quality is the late introduction
(1944), at a time when there were wartime shortages of all kinds of
materials, ranging from wood to metal.
A more plausible explanation however, may be deduced from
the red warning message on the metal cover plate:
Bei drohender Feindgefahr
Verdrahtung der Rasterscheibe zerstören!
|
When the device was about to fall into enemy hands,
the operator was instructed to destroy the wiring
of the scrambler disc. He would then hold the Uhr with one hand and
pull all 20 wires from the box with the other hand.
As the wires are soldered directly to the spring loaded contacts,
This will completely disrupt the Uhr. This will however not
destroy the wiring of the 40 position disc.
When the Uhr is not in use, the plugs (German: Steckern) can be
stowed in the pre-drilled holes inside the top lid.
The 20 long patch cables then have
to be folded in such a way that the lid can be closed.
This is not easy as the cables are stiff
and there is barely enough room for them.
|
Device Plugboard scrambler Purpose Quick configuration of plugboard Name Enigma Uhr (E.U.) Brand Enigma Year 1944 Manufacturer Konski & Krüger (gvx) Country Germany User German Air Force (Luftwaffe) Settings 40 Used with Enigma I Dimensions ? Weight ? Quantity ?
|
- Enigma Uhr
- Gerät E.U.
- Ln.-H. R. B. (GL) 1/III
- Steckeruhr
|
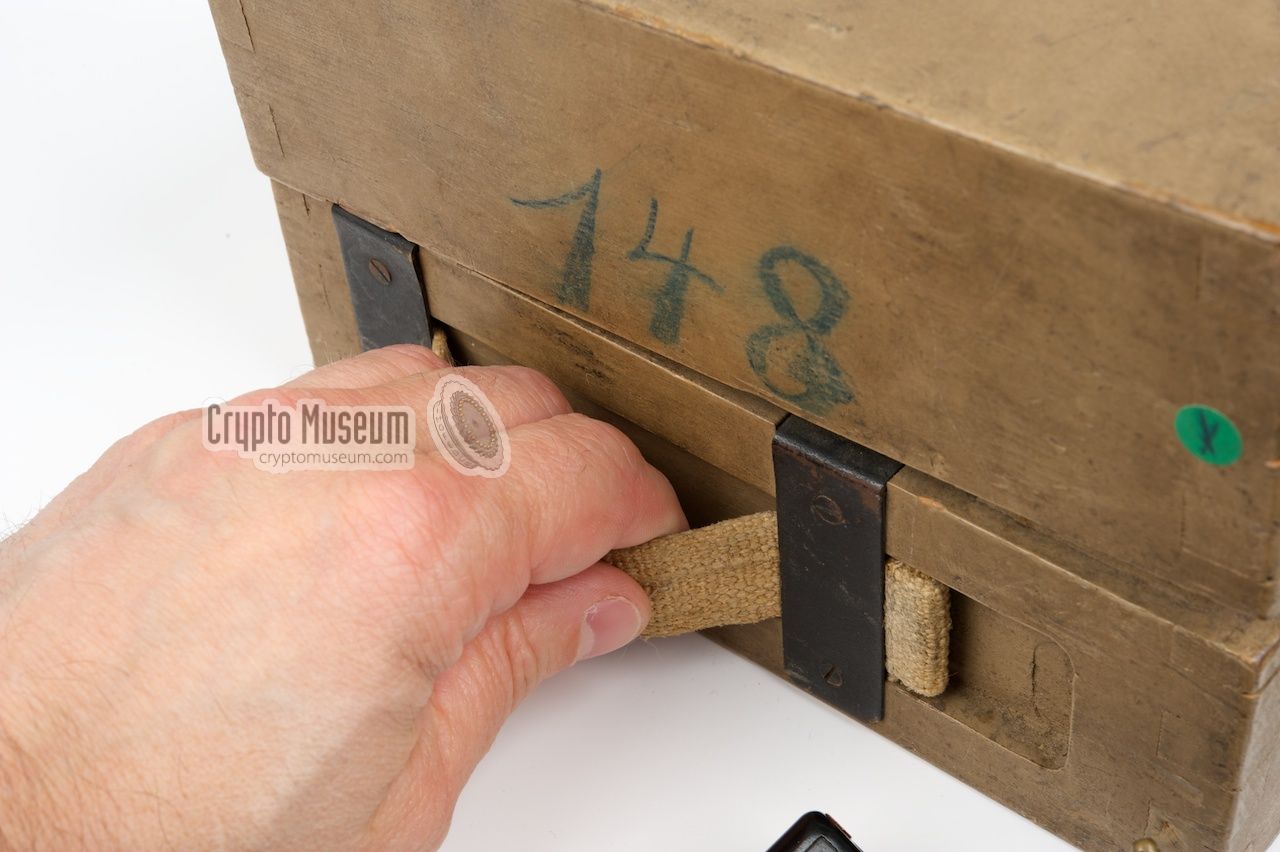
148 Crypto Museum, Netherlands 1266 Glen Miranker, USA
|
- Frode Weierud, Notes on the Enigma Uhr
Parts of the Fried Reports F-62, F-64 and F-112 about the discovery
and usage of the Enigma Uhr, by Walter J. Fried and Sir Stuart Milner-Barry.
NARA, RG 457, NSA Historical Collection.
- Tony Sale, 2001, The Bletchley Park 1944 Cryptographic Dictionary
Formatted by Tony Sale. A Cryptographic Dictionary, NR 4559. NARA, RG 457,
Historic Cryptographic Collection.
- Paul Reuvers and Marc Simons, Gebrauchsanleitung für die Enigma Uhr
UhrBox-E instruction manual (English). The text on this page
was extracted from that manual, which contains further information
and references.
- Gordon Welchman, The Hut Six Story
1982. ISBN 0-947712-34-8
- Arthur O Bauer,
Funkpeilung als alliierte Waffe gegen Deutsche U-Boote 1939-1945
1997. ISBN 3-00-002142-6
- Philips Marks, 2001, Umkehrwalze D: Enigma's rewirable reflector - Part 1
Cryptologia Volume XXV, Number 2, April 2001, p. 101-141.
- Heinz Ulbricht, Enigma Uhr
Cryptologia Volume XXIII, Number 3, July 1999, p. 193-205.
|
|
|
|
Any links shown in red are currently unavailable.
If you like the information on this website, why not make a donation?
© Crypto Museum. Created: Tuesday 11 August 2009. Last changed: Wednesday, 11 February 2026 - 13:35 CET.
|
 |

|
|
|
| |